The Randall Museum in San Francisco hosts a large HO-scale model railroad. Created by the Golden Gate Model Railroad Club starting in 1961, the layout was donated to the Museum in 2015. Since then I have started automatizing trains running on the layout. I am also the model railroad maintainer. This blog describes various updates on the Randall Museum Model Railroad and I maintain a separate tech blog for all my electronics & software not directly related to Randall.
2018-02-28 - Atlas Master Amtrak GE Dash 8-32BWH
Category RandallSo it’s the beginning of January 2018, I am being told the museum opens in one month and I have two engines that are constantly derailing. Not a good way to demonstrate that automated train layout that I’ve been working on for the last 2 years (or at least trying to, when I had access).
Logical plan: have backups. Nothing new, I had mentioned this multiple times in the past. In an effort to move on towards that goal, I got hold of some of the previous GGMRC-owned engines appropriate for the task, namely three P42 and three GE Dash 8-32BWH. The P42s seem in dubious shape, having run quite a lot.
The three GEs seemed better. One was still DC and two had their original Atlas decoders and seemed to run adequately. These are from the Atlas Master line, and came equipped with dual DC/DCC decoders.
After some lubrication (and learning the hard way how to take the shells off) followed by basic speed matching, two GE Dash 8-32BWH are used in the automation program and we get through the Randall Museum’s Reopening Ceremony fairly well, including two follow up Saturday.
The third Saturday is the Science Fair exhibit at the museum. Very large attendance. Record on the RTAC tablets show that the branchline RDC ran 120 times (!) and the Amtrak train ran 45 times.
And by the end of the day one of the engines stalls on some turnouts.
I take both engines home, remove the shell and realize that one of the motor is… smoking :-/
Time to test the motors, I hook up two multimeters to measure voltage + amps:
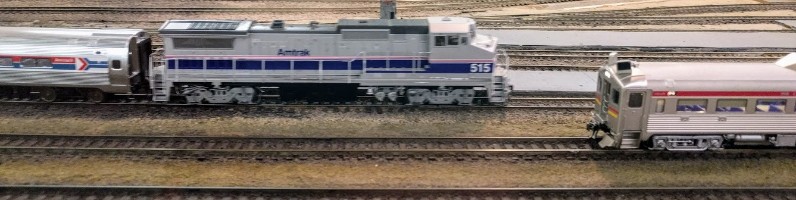
- Engine #515. In DCC, I measure: Speed 1: 1.20 V, 0.1 A, up to speed 28: 9.7 V, 0.23 A.
- Engine #506: In DCC, I measure: Speed 1: 2 V, 0.85 A… huh what?
- Engine #506: In DCC with CV5=128: Speed 1: 1 V, 0.38 A up to sleep 24: 4 V, 1 A.
- Engine #506: In DC, I measure: Speed 1: 2 V, 0.147 A, up to speed 28: 6.8 V, 0.75 A.
These… do not add up. The DC power brick should give me up to 12~14 V, yet it fails to deliver more than 7 V. That means something is trying to draw too much power so it just collapses.
The DCC is measured using a Tsunami 2 instead of the original Atlas decoder. It can deliver up to 2 A, but really it should not have to. In the second test, it provided 4 V at max speed instead of 9~10, and almost 1 A. Also at that point the motor emits some white smoke.
After a discussion on the MRH forums, the consensus is that’s a motor with a damaged winding. The isolation is failing, there are shorts so it uses way too many amps and the voltage just dips. Eventually it will degrade more and more till it’s just a plain and simple short, which will damage the decoder..
To solve this I could replace the motor. I did look around but I hard a time being able to find an adequate replacement. Eventually I did the next best thing, which is to order a replacement engine. I found an unpainted Atlas Master Dash 8-40 being sold, which uses the same chassis and motor. I fitted it with the Tsunami 2 and added sound. I measured the motor and it gave me good numbers:
- Speed 1: 1.6 V, 0.1 A, up to speed 28: 9.5 V, 0.22 A.
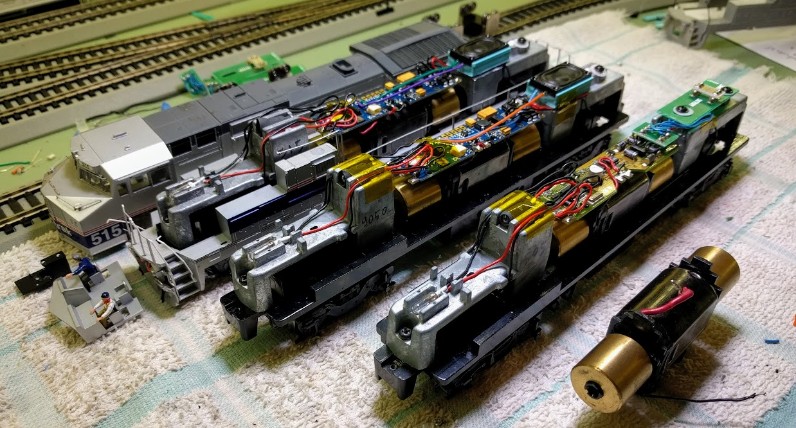
Here’s nice roster picture above. From right to left: the (also damaged) motor from the DC-only unit, the original 506 with its Altas decoder and the failing/smoking motor, the new Dash 8-40 fitted with a Tsunami 2 and speaker before the shell is installed, and finally the 515 with the original good motor, new Tsunami 2 and speaker and in the process of installing the shell.
Tip (and a reminder to myself) to remove the shells on these Dash 8-32/40: remove the couplers, slide off the fuel tanks, use toothpicks to push the 6 tabs under the chassis. These tabs hold the central body. The deck must come off too except it has little horizontal tabs on the sides front & rear that hit the metal frame so need to work them around the metal weights. To reassemble, it’s easier to detach the deck first by detaching the rails on the cab and removing the little black clips under the cabin. Put the deck first, then the nose light support, then the cabin crew and finally the central body.
And another tip: Double check everything before putting the shell back on. I thought I did that. Only to find after the fact one of the engine was not picking up rail power from the rear truck. Obviously a broken wire or, as it turned out, a bad solder to the DCC board. Easy fix, but yet another lengthy process of removing the shell and putting it back on.