Model Train-related Notes Blog -- these are personal notes and musings on the subject of model train control, automation, electronics, or whatever I find interesting. I also have more posts in a blog dedicated to the maintenance of the Randall Museum Model Railroad.
2018-01-21 - Turnouts Touch Panel for JMRI at CMRS
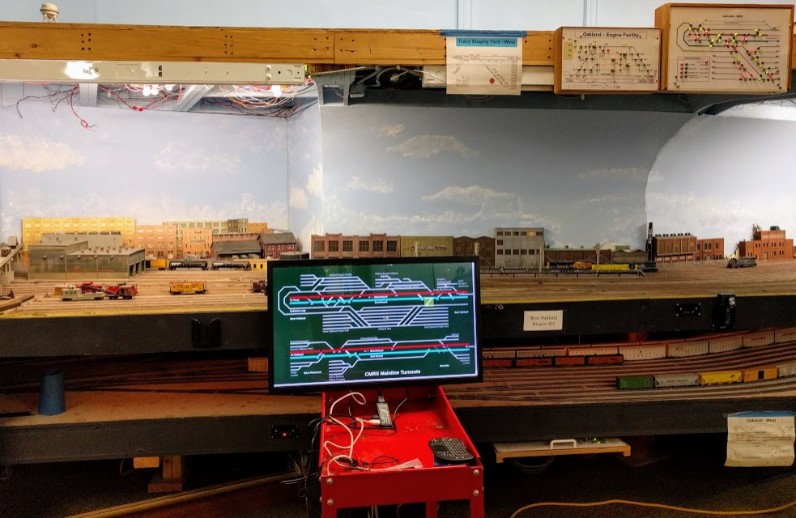
Category CMRSSome members at the CMRS train club (the Carquinez Model Railroad Society, in Crockett, CA) desired to have large touch panels that members could use to toggle switches on the mainline. For testing, one of the members procured 32-inch touch panels and I wrote a quick experimental software to display the mainline on it and control turnouts based on touch.
The touch panels rely on the main JMRI server to trigger turnouts on the mainline.
This post documents my first prototype demonstration for this project. This was going to be an iterative process as I expected to incorporate feedback later. What I came up with is fairly easy to reuse for other layouts -- I’ve implemented something similar at Randall just after, so I’ll explain how it is implemented in the hope others want to use that or get inspired by it..
3- The Need for Turnout Feedback
6- Configuring Ubuntu on the Intel Compute Stick
1- Hardware
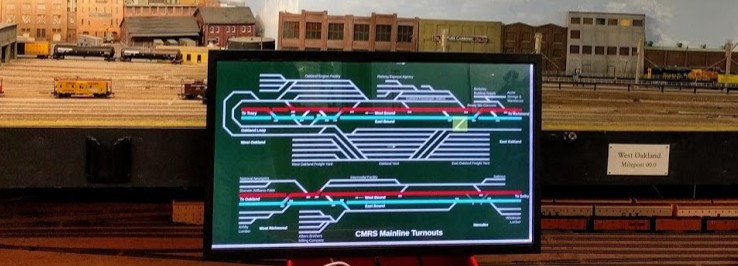
Here is the touch panel, sitting on a cart as a crude temporary support. It should be eventually held higher with a strong support on the top frame.
The screen is actually an ELO ET3243L LCD Touchscreen Monitor. It is very responsive. Output comes as a simple USB HID and thus plugging into any computer will instantly give mouse events. It is used here without any specific drivers.
In this project I only focus on the software part, so this is what I will be describing here.
The computing part is achieved using an Intel Compute Stick (BOXSTCK1A8LFC):
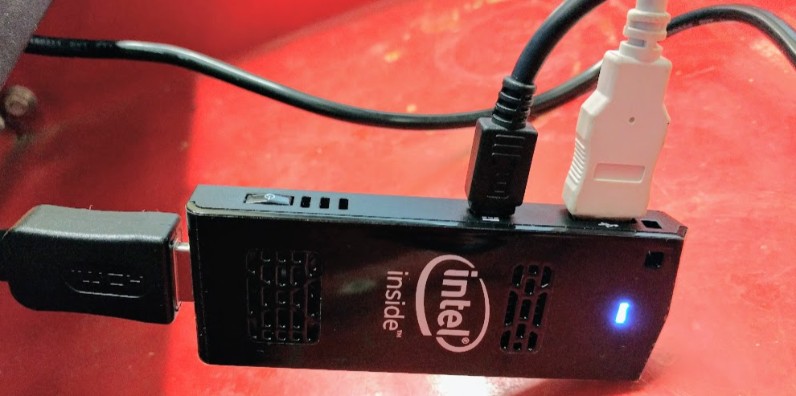
The computer stick connects directly to the HDMI port of the monitor. The black plug at the top is for power and the white plug is the USB from the touch panel.
There are different versions of the Intel Compute Stick. The more expensive versions are more powerful and come with Windows preinstalled, which is not needed here. Instead I choose the cheaper version (around $39) which has lower specifications. It runs a stock Ubuntu with 1 GB of RAM and 4 GB of storage. Amusingly out of the box, Ubuntu takes 90% of these 4 GB of storage, leaving not much room, which is not a problem at all in this application. Storage can be expanded using an SD card slot though (also not needed here). However it has integrated WiFi, which we want in our use case.
The computer does one thing here: it’s just a single Chrome web page on Kiosk mode, and that is absolutely all there is to it.
2- Architecture
If the computer stick just displays a web page, how does this thing actually control any turnouts?
That’s the beauty of it -- everything is on the JMRI server:
- JMRI has an integrated web server that can serve any page. I just made a specific web page for this display.
- The layout map on the touch panel is an SVG file which I created with Inkscape. The file is served by JMRI.
- JMRI has a “JSON server” which can be used to query the status of turnouts and receive commands to change them.
- JMRI provides a Javascript extension (“jquery.jmri.js”) that a web page can trivially use to query and set the turnouts. It integrates with the JMRI JSON server seamlessly.
- JMRI advertises its server location using ZeroConf, which a custom script on the computer stick reads to figure how to connect to the JMRI web server. This means when the computer stick boots, it automatically finds the JMRI server on the wifi network, and connects to it to retrieve the web page and runs Chrome in Kiosk mode to display it.

Another nice thing here is that as far as this project is concerned, it does not matter which DCC Command Station is being used, nor which kind of DCC-controlled turnouts are used as long as JMRI can control them. It could be an NCE or Digitrax or even an SPROG or a DCC++ command station for example. Turnouts can be controlled by anything that can read DCC accessory packets on the DCC bus, from NCE Switch-8 to Digitrax DS64 or DCC Specialties’ Wabbit / Hare. JMRI can also support an heterogeneous mix so it could even be a combination of all of these and more.
3- The Need for Turnout Feedback
Turnout feedback is recommended here; it’s optional yet it does impact how this kind of solution is used if not present.
When a turnout is defined in JMRI, the software has no idea if the physical turnout is closed or thrown so all new turnouts are marked as “undefined” in JMRI. When the software actually throws a turnout, it then consequently knows its position.
However if there’s a physical button controlling the turnout, users can change the turnout and the JMRI server will not know about this -- it will only know the last position that it did control.
For example let’s say a user aligns turnout 200 to normal using WiThrottle or Engine Driver. This sends a command to JMRI which then knows the turnout is “closed” (JMRI’s terminology for a normal turnout). Then another user uses a fascia button connected to a Wabbit to throw the turnout. JMRI doesn’t know about that state. The touch panel will show the turnout as normal/closed when it is in fact reverse/thrown -- the display will simply be wrong and misleading!
JMRI supports reading turnout states from some command stations such as NCE and Digitrax. Even this is not real feedback and only displays the state that the command station knows, typically when users throw a turnout using their cab.
To really have an accurate view of the turnouts states, one needs extra hardware to monitor the position of the turnouts.
There are multiple ways to do that and giving a list of these is out of the scope of this document. A typical and non-exhaustive example is using the extra contacts from a Tortoise or from a Wabbit and feed them to a sensor card such as the Team Digital SRC8, NCE AIU01, Digitrax DS64 or Lenz LR101. The DCC Specialities Wabbit’s documentation (section D, page 11) has a clear example of how to connect these to get feedback. After that, JMRI can be configured to read the sensors from the Digitrax LocoNet or NCE Cab Bus and update its internal turnout state to match the actual sensors.
Some personal opinions here:
- Digitrax products work well but their documentation is annoyingly complex and verbose.
- NCE products are ridiculously easy to use but they have noticeable performance issues. For example, from experience, JMRI reads from NCE AIU01 cards by polling each one by one, at a rate of one per second or less. That results in noticeably sluggish feedback.
- Is turnout feedback really necessary? Personally I think “really yes” if you have fascia buttons that control turnouts directly and “really no” if you don’t have fascia controls.
- I explicitly did not mention custom DIY Arduino-like solutions. I love that kind of stuff. I do it all the time at home. But if this is on a club layout and not on a personal layout, I stick to commercial offerings. It may be a bit more expensive but that way the day the next superintendent is elected, nobody will be cursing my name for having used some kind of obscure and unmaintainable arduino thing that nobody knows how to use anymore. Remember: when people can’t figure out what some device does, they generally trash it or bypass it and then add their own solution instead. It’s easier to reinvent the wheel than to figure how it was made round in the first place.
Turnout feedback means even more wiring on the layout. Using a commercial product like the NCE AIU01 or the Digitrax DS64 means having wires from each turnout DCC decoder to the sensor board, then a bus (NCE cab bus or LocoNet) going to the command station or a PR3. I made a quick prototype of a custom solution based on a ESP32 board using Wifi that I should detail in another post.
4- Setting up JMRI
Let’s dig in what needs to be set in JMRI to make this work.
Note: I’m going to do this like a “tutorial”. If interested, just follow the steps as-is and try to get it working. Once it works you can think of customizing it, as you’ll inevitably want to change things like the club name, the map, the turnouts numbers, etc.
For this tutorial, I’d recommend that a new profile be created in JMRI (you do have backups, right?) in case you want to revert any changes. The map provided below expects NCE turnouts with an “N” prefix so that needs to be created first (or edit the files as indicated below).
Both the JSON server and the Web server will be used so they need to be enabled in the JMRI preferences and set to startup automatically:
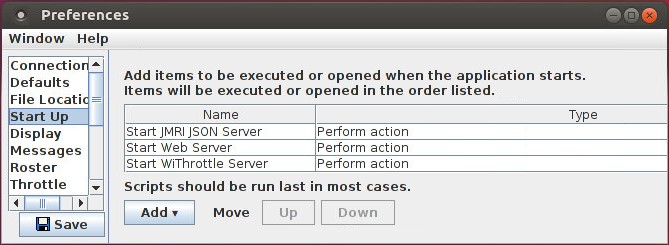
Note that the preference dialog changes slightly based on the version of JMRI yet the concept remains the same: open Edit > Preferences, select the “Start Up” panel, then “Add > Perform Action” for the “Start JMRI JSON Server” and again for “Start Web Server”.
By default JMRI uses port 12080 for the web server (this is configured in Edit > Preferences > Web Server). If you have no idea what that means, just leave it as-is. Simply remember that number and if you use a different port, you’ll want to adjust other files later accordingly.
Then hit “Save” to save these preferences. JMRI will ask if you want to restart now or later. It’s just easier to restart right now.
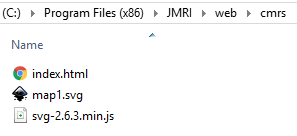
Next you need to copy 3 files into the JMRI web server directory.
Where that folder is located depends on which operating system you use. Typical examples:
- Windows 7, 8, 10: C:\Programs Files (x86)\JMRI\web
- Linux: /home/user/JMRI/web
First create a new folder in the “web” folder, in my case “cmrs”, and copy these 3 files in there:
- JMRI/web/cmrs/index.html
- JMRI/web/cmrs/map1.svg
- JMRI/web/cmrs/svg-2.6.3.min.js
The files are stored in this Bitbucket git repository: https://github.com/model-railroad/cmrs-layout
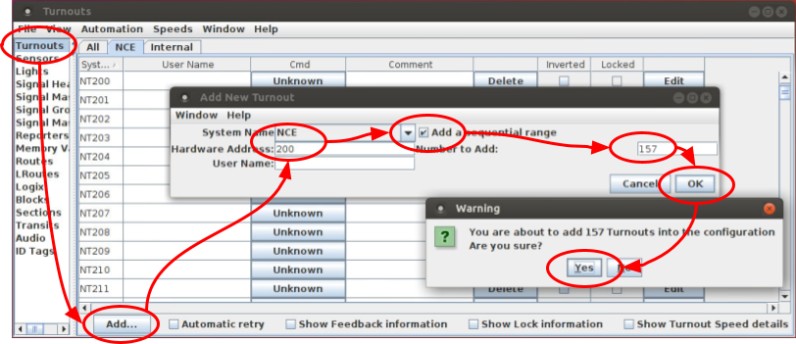
Next we need to create the turnout entries. The map provided above uses numbers from 200 up to 356 so let’s create them:
- Open the Tools > Tables > Turnout dialog
- Select the NCE connection (or whatever else you use), click “Add”, enter 200 as the base number, enable the “sequential range” and enter 157 as the “number to add”. Click OK twice.
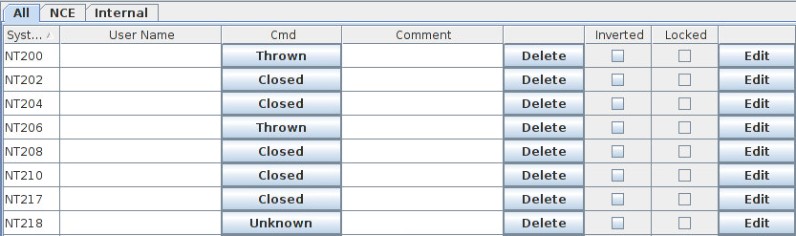
- Now we have turnouts with a “JMRI system name” of NT200 up to NT356. Note that they start in the “Unknown” state.
Check whether your turnouts are created with feedback enabled or not as it will matter later:
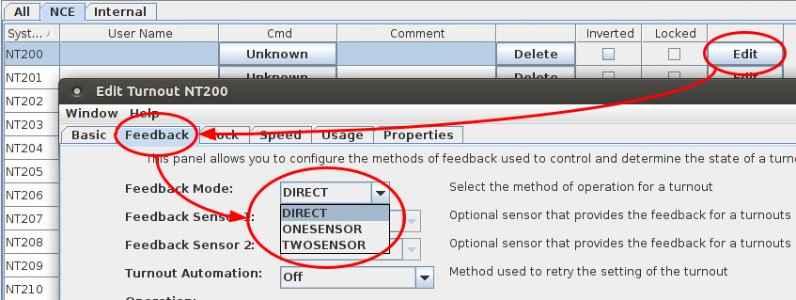
The type of feedback available and the default depends on which command station is used in the Edit > Preferences > Connections panel.
If you are not using the default NCE connection with an “N” prefix, you need to edit the “index.html” file.
- Open the file with a text editor (I recommend Notepad++ on Windows, vim on Linux).
- Change line 118 that reads: “var jmriName = "NT" + tid;”
- Replace the “NT” prefix that whichever connection prefix is appropriate for your connection, for example typically “LT” for a LocoNet.
Now we are ready to try this. Open a Chrome window and point it to your JMRI web server.
For example if you are reading this on your JMRI computer and it uses the default 12080 port, you can simply click on this link:
http://localhost:12080/web/cmrs/
Adjust the URL or the port number as needed.
This should load the index.html files, which will in turn load the map1.svg and display it:
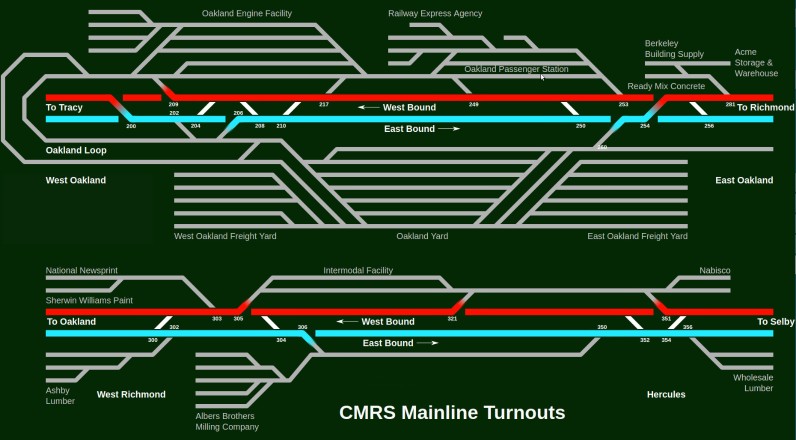
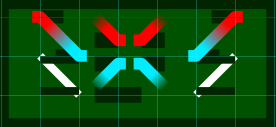
Note that the mainline turnouts are represented this way:
Unknown State |
Closed (a.k.a. Normal) |
Thrown (a.k.a. Reverse) |


Clicking a turnout on the mainline should toggle its state between “closed” and “thrown”. When a turnout is “unknown”, it will be set to “closed” first. Depending on the way turnouts are configured, the change on the map can be instantaneous or take several seconds to reflect the command.
What happens exactly: when you click on a turnout on a map, it sends a JSON command to JMRI to toggle the turnout in the desired state. JMRI sends a DCC command via the command station. Then JMRI in turn sends a signal back to the web page to update it to match its current state. The exact behavior depends on how turnouts are configured:
- If JMRI turnouts do not use feedback, the new state will be reflected on the web page immediately and purely reflect what JMRI thinks is the state of the turnout.
- If JMRI turnouts use feedback, the new state will be reflected only after JMRI got feedback from the command station or the sensors. So there might be a delay between when the turnouts are taped on the map and when the drawing actually changes.
The default depends on the command station used. LocoNet feedback should be fairly fast. NCE feedback using the “Monitoring” option can take a few seconds to happen. The low-cost NCE command stations (PowerCab, DCC Twin) do not support monitoring, in which case the feedback appears to be instant.
You can double check the turnouts states in the JMRI Turnouts Table:
5- Editing the Map & HTML
The SVG Map
The latest version of the file can be found here:
https://github.com/model-railroad/cmrs-layout/blob/main/jmri/web/cmrs/map1.svg
The SVG map has been created using Inkscape. Any other SVG editor will do. Unless you really know what you’re doing, I don’t recommend editing SVG directly by hand. If you know what you’re doing, you’d not be reading this anyway :-)

I’m only providing some quick notes and not going in extensive details here as I think most of it is fairly self explanatory:
- The top layer “Touch Zones” contains yellow rectangles. They must stay visible. The JS code uses them to define hit targets for the turnouts and animates their visibility when they are touched.
- As you can see I started with rectangular hit targets. I plan to switch them all to circles and make sure they don’t overlap.
- There’s a layer for all turnouts in the thrown position and another for all the turnouts in normal position. These are clones of master objects so that I can just edit the master and all the clones change at the same time. All these work as overlays -- the normal position object is shown when the turnout is normal and hidden when the turnout is thrown, and vice versa.
- All the master objects (before being cloned on each turnout) must be visible and not hidden (otherwise all clones are hidden too). They are simply tucked in a corner of the map, hidden under a rectangle matching the background color. The center objects are for mainline-to-sidings and the outer objects are for the mainline crossovers:
Naming patterns must match the Javascript:
- All touch hit targets are named “Touch123” where 123 is a turnout number, e.g. “Touch200” for turnout number 200.
- All “normal position” objects are named “TN123”.
- All “reverse position” objects are named “TR123”.
Follow-up: when I did the version for Randall Museum, I revisited the SVG a bit. Using clone elements is actually a problem (the javascript code must be careful not to change the visibility on the original element). Although the blue/red gradient thing looked nice at first, it grew old very quickly and design-wise I prefer a flat look. The one I redesigned for Randall uses less layers and is easier to edit.
The HTML file
The latest version of the HTML file can be found here:
https://github.com/model-railroad/cmrs-layout/blob/main/jmri/web/cmrs/index.html
I’ll go very quickly over this because there’s not much to see here.
The HTML file relies on the SVG.js library to load and manipulate the SVG file. The minified svg-2.6.3.min.js is saved locally and served by the JMRI server since the wifi network used for WiThrottle does not have internet access.
Loading the SVG is done dynamically:
<body> <div id="svg_container" class="svg"></div> <div id="loader" class="load">Please wait, loading...</div> </body> … function loadSvg() { console.log( "document loaded" ); $("#svg_container").hide(); svgDoc = SVG("svg_container"); $.get(svgUrl, function(contents) { var _tmp = $("svg", contents);
svgDoc.attr('viewBox', _tmp.attr('viewBox')); svgDoc.attr('width', _tmp.attr('width')); svgDoc.attr('height', _tmp.attr('height'));
svgDoc.svg(_tmp.html());
console.log("SVG loaded");
$("#svg_container").fadeIn(); $("#loader").fadeOut();
$("[id^='TN']").hide(); $("[id^='TR']").hide();
setupJmri(); }, "xml"); } |
JMRI provides a jQuery plugin to communicate with the JMRI JSON server. On Chrome, it uses a websocket. Once the javascript requests the state of a turnout, it will automatically receive updates as soon as the state changes, without having to poll the server periodically. This results in some neat and compact code:
<script src="/js/jquery-1.11.2.min.js"></script> <script src="/js/json2.js"></script> <script src="/js/jquery.websocket.js"></script> <script src="/js/jquery.jmri.js"></script> … function setupJmri() { jmri = $.JMRI(jmriUrl, { open : function() { console.log("JMRI: open "); }, close: function() { console.log("JMRI: close"); }, console: function(data) { console.log("JMRI: " + data); }, goodbye : function() { console.log("JMRI: goodbye "); }, didReconnect : function() { console.log("JMRI: didReconnect "); }, failedReconnect : function() { console.log("JMRI: failedReconnect "); },
hello : function() { console.log("JMRI: hello");
svgDoc.select("[id^='Touch']").each(function () { setupTurnout(this); }); },
turnout: function (name, state, data) { console.log("Got turnout \"" + name + "\" with state " + state + ".");
var tid = name.substring(2); var idNormal = "TN" + tid; var idThrown = "TR" + tid;
$("#" + idNormal).fadeTo(250, (state === jmri.CLOSED) ? 1 : 0); $("#" + idThrown).fadeTo(250, (state === jmri.THROWN) ? 1 : 0);
svgDoc.select("[id=Touch" + tid + "]").each( function() { this._state = state; }); } }) jmri.connect(); } |
Each touch hit point is selected and configured to have a callback when “clicked” that sends the JRMI setTurnout command. Two important notes here:
- The “jmri.getTurnout” call does not actually receive anything -- it registers this turnout to receive all updates automatically via the $.JMRI( { turnout } ) object defined previously.
- The “jmriName” needs to be tweaked. In particular this implementation just extracts the number and assumes all turnouts are NCE turnouts using the “N” prefix, thus having names such as “NT200”. This needs to be adjusted for specific layouts. For example the turnout prefix could be part of the “Touch” label (e.g. “TouchNT200”) or it could be customized using a range (e.g. “jmriName = (tid < 200 ? “LT” : “NT” ) + tid;”).
function setupTurnout(t) { var tid = t.attr("id").substring("Touch".length); var jmriName = "NT" + tid;
console.log("Setup turnout: " + jmriName);
jmri.getTurnout(jmriName);
t._state = 0; t.style("visibility", "visible"); t.style("opacity", "0"); t.click(function() { console.log( t + " " + t._state ); t.animate(125, "<>", 0).style("opacity", "1").animate(125, "<>", 0).style("opacity", "0"); if (t._state == jmri.CLOSED) { jmri.setTurnout(jmriName, jmri.THROWN); } else { jmri.setTurnout(jmriName, jmri.CLOSED); } }); } |
I see these files as merely templates that need to be adjusted to specific customer developments.
6- Configuring Ubuntu on the Intel Compute Stick
The Intel Compute Stick I choose is the “lower-end model” one. It comes with Ubuntu which is much better suited for our needs here than the more powerful version with Windows 10.
First time the computer stick is plugged, it will go through the standard Ubuntu install and there’s nothing very specific to say about this except to set the user to auto-login.
Once the Ubuntu install is finished, I added some convenience packages:
$ sudo apt-get install gvim screen openssh-server x11vnc $ printf "set modeline\nsyntax on\n" > ~/.vimrc |
That way I can easily remotely administer it using SSH and VNC.
The first time I then let the Software Updater update the kitchen sink.
Two packages were problematic so I removed them after:
$ sudo apt-get remove chestersmill-settings oem-hdmi-audio-dkms |
Next I used the Ubuntu Software Center to remove a bunch of packages that are not needed on this machine: Rhythmbox, Totem, all of Libreoffice (e.g. calc, impress, writer, math, draw, etc), Shotwell, Uunity Lens Photos, Chestersmills.
Out of the box, Chromium was crashing when I was trying to open a page. That was easily solved by removing it using the Software Center then reinstalling it. Once I got Chromium working, I launched it to change some settings:
- Settings > Manage Passwords > Turn off
- Settings > Autofill Settings > Turn off
Very important, I had to change the power settings:
- System Settings > Brightness & Lock
- Disable “Dim screem”
- Turn screen of … Never
- Lock Off
- Uncheck require password when waking from suspend
- System Settings > Power
- Don’t suspend
Next I created these 3 files:
- The “chrome_loop” file tries to discover the JMRI server using ZeroConf and runs Chromium in Kiosk mode.
- The “terminal_kiosk” one simply opens a terminal to run “chrome_loop”. This way the output of the script can be seen and users can alt-tab to select the terminal and close the kiosk.
- The “autostart/.desktop” creates an entry that will run “terminal_kiosk” automatically once the user is auto-logged in.
$ cat ~/.config/autostart/.desktop
[Desktop Entry] Type=Application Exec=/home/cmrs/bin/terminal_kiosk.sh Hidden=false NoDisplay=false X-GNOME-Autostart-enabled=true Name=CMRS Kiosk Comment=Startup Script |
$ cat ~/bin/terminal_kiosk.sh
#!/bin/bash /usr/bin/gnome-terminal --geometry=80x20+200+200 -x sh -c "/home/cmrs/bin/chrome_loop.sh | less" |
$ cat ~/bin/chrome_loop.sh
#!/bin/bash # vim: set ts=2 sw=2: # # Find the first accessible JMRI web server advertised via ZeroConf on the local # network then opens the CMRS turnouts web page using Chrome in kiosk mode.
while true; do echo JMRI_IP_PORT="" while [[ -z "$JMRI_IP_PORT" ]]; do for J in $(avahi-browse -a -t -p -r | grep “IPv4” | grep "Web Site" | grep jmri | awk -F ";" '{print $8 ":" $9}'); do IP_PORT="$J" IP="${J%:*}" PORT="${J#*:}" echo "Trying $IP_PORT..." if printf "GET / HTTP/1.0\r\n\r\n" | nc -n -w 2 $IP $PORT | grep -q html ; then echo "Found JMRI Web Server at $IP_PORT" JMRI_IP_PORT="$IP_PORT" break fi done if [[ -z "$JMRI_IP_PORT" ]]; then sleep 1s echo -e "\nJMRI Web Server not found. Retrying...\n" sleep 1s fi done echo -e "Starting Kiosk for $JMRI_IP_PORT\n" sleep 1s chromium-browser --incognito --password-store=basic --kiosk http://$JMRI_IP_PORT/web/cmrs/ sleep 1s done |
Let’s look at this last script.
I use avahi-browse to do ZeroConf discovery. It prints all entries found in a terse “parsable” format. I only want IPv4 entries for jmri with the Web Site service. The awk command filters the address:port from the avahi output:
avahi-browse -a -t -p -r | grep “IPv4” | grep "Web Site" | grep jmri | awk -F ";" '{print $8 ":" $9}' |
Next I use netcat to check if there’s really a web server we can connect to at that address:port combo:
printf "GET / HTTP/1.0\r\n\r\n" | nc -n -w 2 $IP $PORT | grep -q html |
Finally I open Chromium with a few options:
chromium-browser --incognito --password-store=basic --kiosk http://$JMRI_IP_PORT/web/cmrs/ |
- --kiosk puts the display in full screen. Note that it is not very hard to escape the kiosk mode here (see below for discussion on that topic).
- --password-store=basic prevents Chromium from trying to unlock the standard Ubuntu keychain. If that option were not present, Chromium would show a popup asking for the main user password to unlock the keychain, to be able to auto-save autofill and managed passwords. We don’t want that here. Note that the “basic” store is an unencrypted one, which is fine here.
- --incognito prevents Chromium from remembering this page was open. This prevents it from showing the dialog “do you want to restore pages” if the device is turned off before Chromium is properly closed.
Now we should have a talk about security, and for that we need to start with “who are your users?”
An important point here: in this current setup, it is trivial to “escape” the Kiosk mode by simply hitting Alt-Tab or event just Alt. From there, the terminal with Chromium can be closed and the user can do pretty much anything they want on the machine.
Given this is used in a private club, we don’t have to actively prevent users from being malicious. It’s not the type. However we want to actively prevent them from doing things by mistake, which is way more likely to happen. And for that:
- There is no keyboard connected to the machine. The Intel Compute Stick has a single USB port which is connected to the touch panel. So users cannot “Alt-Tab” by mistake.
- They can however long-press by mistake on the touch panel, which currently selects text in the SVG map and opens a menu with a “Copy” option. No harm here, but this is annoying so I’ll override it in javascript.
Now if I were to install this in a public location, I would take a few more drastic measures:
- Lock the BIOS with a password.
- Disable booting from the SDCard or USB in the BIOS.
- Enforce a strong password on the JMRI wifi.
- Create a secondary user with no admin privileges and not part of suoders on the computer stick and have this one be the auto-logged one.
- Modify the kiosk javascript to absorb and ignore all keyboard input using the document.onkeydown event.
To finish, I‘d like to point out that the proper way to use this computer stick with Ubuntu would be simply get rid of Ubuntu and instead create a dedicated Debian Live CD. This would allow reducing the OS to the strict minimum needed (x11, chromium and the network wifi stack) and reduce the boot time while making it harder to override behavior.
7- Alternatives Considered
The brainstorming on this project was interesting:
- It started with “let’s have a 24-inch touch panel and donated Pentium-powered tower PC to drive it, running its own JMRI server”.
- I scaled that down to a laptop instead of a tower PC.
- Then to a Raspberry Pi 3 or similar.
- Then to a Chromestick Chromebit.
- Then scaled it back to a Intel Compute Stick running Windows 10
- And finally scaled it down to an Intel Compute Stick running Ubuntu.
On the software side, iterations considered ranged from:
- Running a separate instance of JMRI.
- Writing my own C# “thin client” on Win 10 (to use the kiosk mode for Universal Windows Apps).
- Or simply a Java-based web server coupled with a Jython extension for JMRI and a local browser on the stick.
- Then it hit me that JMRI already runs a “Java-based web server”, that the Jython extension would basically do exactly what the JMRI JSON server does and that if we use an Ubuntu stick we have Chrome in kiosk mode.
As far as the Intel Compute Stick goes, I really like it. The “BOXSTCK1A8LFC” (ouch, you do think Intel’s marketing would step in and come up with a name more catchy than this) is on par or even better than a Raspberry Pi 3. The Intel one comes with a power supply, WiFi, an HDMI cable, an internal 4 GB storage and all wrapped in a convenient form factor, all for the same or smaller price that the RPi 3 which comes with none of it. The equivalent for the RPi 3 would be a kit that adds power supply, wifi, box, sdcard and HDMI cable, which is going to add $20 or so to the base price. So in this regard the Intel stick is a better deal. The only thing the RPi 3 has for it is a catchy name, more hype than you can shake a stick at, and a GPIO which is of no use here.
The likely contender here, which is worth pointing out, is using a Chromebit -- which is often improperly called a “chrome stick” except that’s not an actual product name, the actual official name is a “single app Chrome kiosk device”. It’s made by ASUS and is more expensive than the Intel one ($85, 2 GB RAM, 16 GB storage). The downside is that to develop a proper kiosk-mode “single-app”, it does require getting an enterprise license and it is not clear to me how it would work on the closed JMRI wifi network with no internet access.
8- Conclusion & Updates
Overall I was extremely satisfied with how that was working. I gave a short limited demo of this at the club, and the initial response seemed quite positive. We all agreed I would rework the map to try a few variations. We also quickly identified the need to have turnout feedback, and I later explored that on the side using an ESP32 but I never got to demonstrate it.
The one part that did not work as expected during my demo at the club was the ZeroConf discovery on the closed JMRI wifi network. I didn’t dig too much into what was going on, but I did notice that all Android phones were having trouble finding JMRI. Since they ran that wifi box with a fixed IP, the problem was quickly solved by changing the IP on the Intel stick.
My only concern was the physical screens / touch panels which had been used for the experiment. I personally found the 32-inch panels too bulky and heavy for the task. I believe the logic behind that choice was to have the largest surface area to avoid people tapping the wrong turnout by mistake. But there are other ways to do it, for example it would be a bit more logical to look at the existing physical button panels and match that density, and using additional smaller screens each displaying less of the layout map.
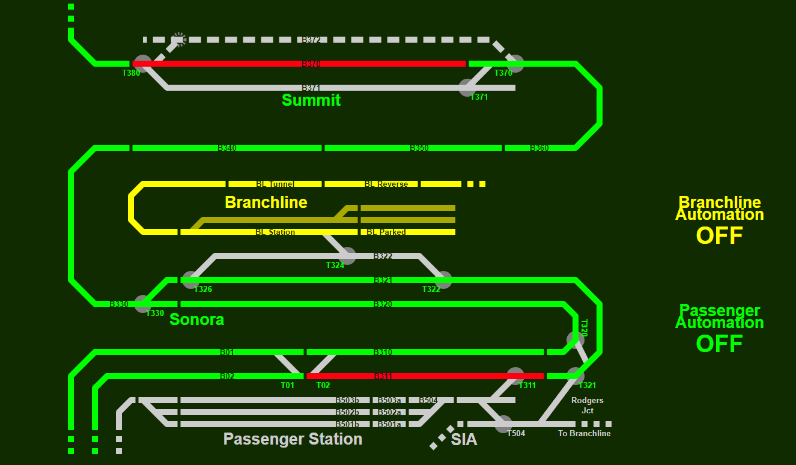
In the meantime, I reused all this when I worked on the automation computer for the Randall Museum. I also have 10-inch tablets (not pictured here) with the map:
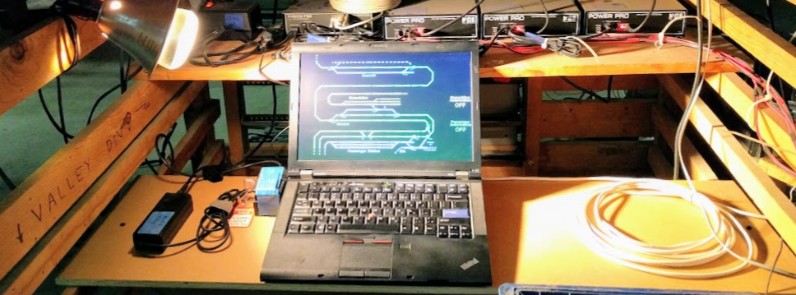
The laptop is a Linux server running JMRI. Once started, it also runs a full-screen kiosk-mode version of Chrome with the automated layout map:
There is one nice thing about this setup. The computer startup is fully scripted, Linux boots automatically, starts JMRI and then starts Chrome with the map, which only displays properly after it connects to JMRI. Thus we know the whole system is up and running when the map is displayed. I can train the Museum staff to simply look at the laptop: if it displays the map, the whole JMRI setup is working as intended. They don’t need to figure out more than that.
In this version I also have block sensors mapped on segments of the track as well as the state of the automation toggle switches clearly indicated. I reworked the way turnouts are represented in the SVG to make it simpler, and added the gray “hot spots” to indicate where the touch-enabled turnouts are located on the screen. The corresponding files are located in the randall-railroad git repo. It’s minimalist in purpose. These do exactly what I need and no more. Feel free to take that and reuse them.