Cab Engineer: DCC Throttle |
2020-04
Cab Engineer: DCC Throttle is an Android application to control model trains over wifi by using JMRI’s Wifi Throttle.
Run your model trains from your Android phone with a JMRI server!
Cab Engineer: DCC Throttle is available on Google Play.


A DCC Cab Throttle for JMRI
Table of content:
1- What is Cab Engineer: DCC Throttle?
3- Connecting to a JMRI WiThrottle Server
4.1- Selecting an engine by DCC Address
4.2- Selecting an engine from the JMRI Roster
4.4- Controlling Multiple Engines
4.6- Disconnecting from Server
6- Limitations & Planned Features
1- What is “Cab Engineer: DCC Throttle”?
The TL;DR: Run your model trains from your Android phone with a JMRI server!
The complete explanation:
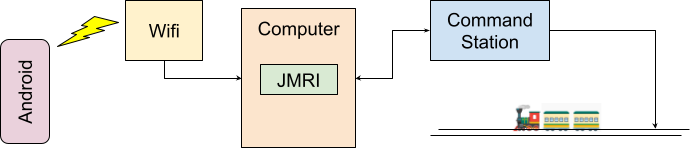
Modern model train layouts are typically controlled by a digital command station. JMRI is a free software that runs ona computer (desktop, laptop, Raspberry Pi) that is commonly used to control trains via these digital command stations.
The Cab Engineer application interfaces with your current JMRI server and provides a simple way to control your layout via an Android smartphone or tablet. The application supports throttles (to drive trains) and turnout controls. Trains can be selected by their DCC address or from the JMRI engine roster.
2- JMRI Setup
Cab Engineer is an Android application that connects to a JMRI server and lets you operate your trains directly from your Android smartphone over wifi, giving you freedom of movement to follow and operate your trains as they go along the model railroad.
Step 1: JMRI
JMRI is a free software that lets one control a model railroad via computer (Windows, Mac, or Linux). In a typical setup, a digital command station (e.g. NCE, ECoS, Lenz, etc) is connected to a layout, and a digital protocol such as DCC or equivalent is used to control trains engines, or accessories such as turnouts. Trains can then be operated either via physical controllers connected to the command station, or via the computer running JMRI.
If you do not have a JMRI server running, head over at https://www.jmri.org/, and look at the manual page to get started. If you are really starting from scratch, the documentation on the JMRI web site can be a bit terse to navigate at first. In that case, head to YouTube where you can trivially find tons of videos explaining how to get started with JMRI, and/or use the JMRI Users group (see JMRI contact page).
Step 2: Wifi Throttle
Cab Engineer requires that the JMRI software be installed, running on a computer, and connected to your wifi network. One of the features of JMRI is called the “Wifi Throttle” and it should be enabled (please note that it is sometimes called “Wifi Throttle”, or “WiThrottle”, or “WiThrottle Server”... these are all the same thing).
Assuming you have the JMRI software installed and running and being able to control your layout, you will want to make sure that the Wifi Throttle feature is activated. If it is, you’ll see a window named “WiThrottle” like this:
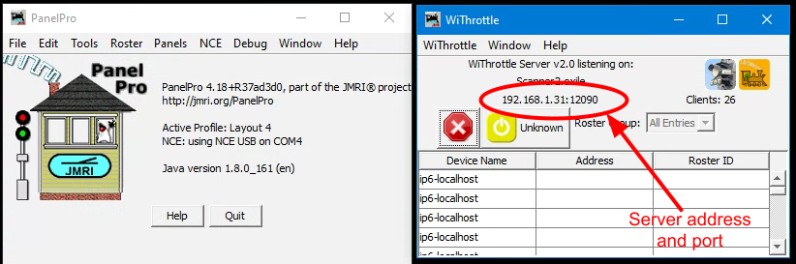
The “WiThrottle” window is useful as it indicates the server’s address and port, which is needed to connect to later.
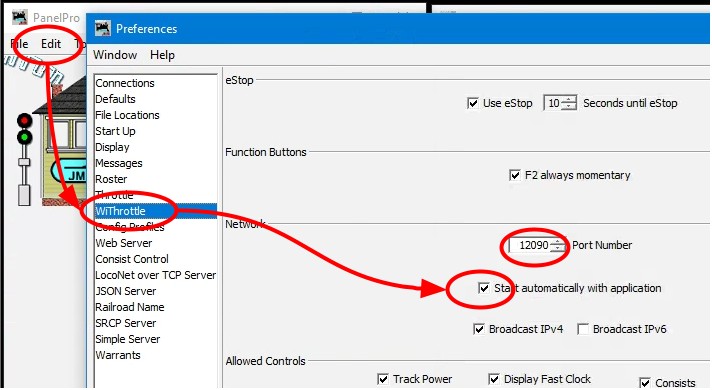
If for some reason the wifi throttle is not started by default, you can enable it as such:
- In Panel Pro, select the Edit menu and then Preferences.
- In the Preferences window, select the “WiThrottle” entry.
- Check the “Start automatically” checkbox.
- Click the “Save” button in the Preferences window, and restart JMRI when asked to do so.
Then proceed to the next section.
3- Connecting to a JMRI WiThrottle Server
If you haven’t installed it yet, head over to the Google Play app store and install Cab Engineer.
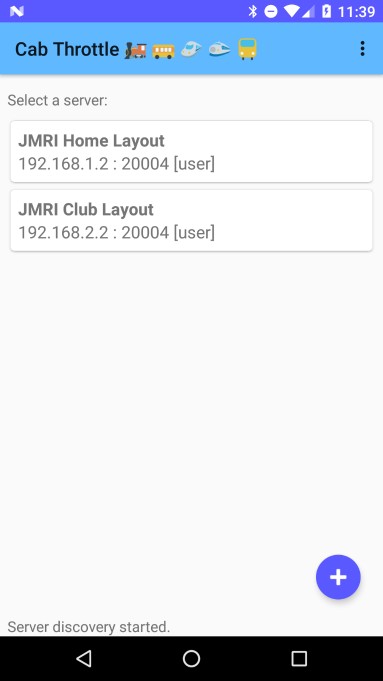
When the app starts, it opens the “servers screen”. The app scans the local wifi network for any known JMRI WiThrottle servers. If any can be found, they will be listed on the servers screen, as can be seen on below.
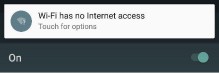
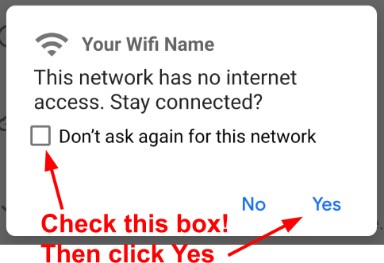
Important: your phone must be connected to the same wifi network that the JMRI computer is connected to. If you use a dedicated wifi network with no internet access, Android will detect that and attempt to automatically disconnect and connect you to a different wifi or cell network. If you see an Android notification that indicates “Wi-Fi has no internet access”, be sure to select it, and in the next dialog check the “Don’t ask again” box before clicking “Yes”:
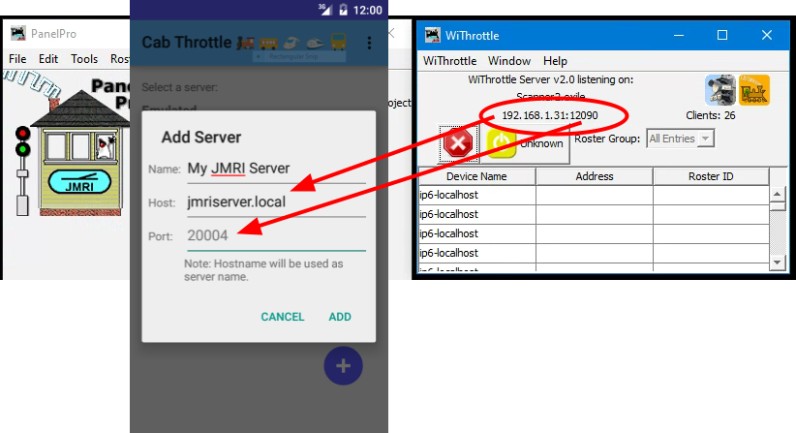
In many situations, I find that JMRI servers do not appear automatically. This can happen due to local network or local wifi configurations that may block the zeroconf broadcasts. In that case, use the “+” icon to manually add the server. This brings a little dialog window where one can enter:
- Name is whatever human-friendly name you want to see in the connection list. For example I typically call my connections “Home Layout” vs “Club Layout”, to be more obvious later.
- Host can be either a hostname or an IP address. You’ll find it in the WiThrottle window.
- Port can also be found in the WiThrottle window. JMRI 3.x used to default to 20004, whereas JMRI 4.x seems to now default to 12090, or the port could have been changed in the WiThrottle preference panel.
Once the server is listed in the servers screen, tap the server to connect to it and enter the “throttle screen”. The first thing this screen asks is which train you want to control.
4- Controlling Trains
The “throttle screen” is where you can control trains, or more exactly engines.
4.1- Selecting an engine by DCC Address
When you connect to a JMRI Server, Cab Engineer immediately prompts you for which engine to control.
This screen is tailored for DCC addresses. When it first opens, you are asked which engine’s DCC address to control.
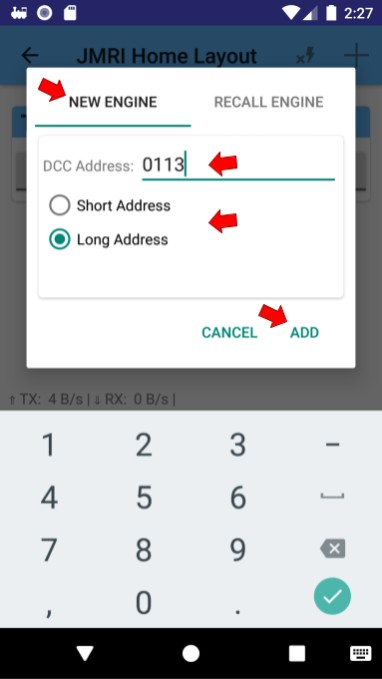
In the dialog window, select the “New Engine” tab and simply use the keypad to enter the number. For DCC, select either the “short” or “long” address if you know which one -- or let the program figure it out for you. Finally click the “Add” button to control the engine.
The DCC address input is based on the NCE model:
- Numbers 1 up to 127 represent “short DCC addresses”.
- Numbers 128 and above represent “long DCC addresses”.
- If the short/long address mode is not what you want, use the toggle buttons to select the proper mode.
- To force entering a “long” address that is lower than 128, prefix it with a zero. For example in the case above, entering “0113” will automatically mark it as a long address, even though 113 is smaller than 128.
4.2- Selecting an engine from the JMRI Roster
In the dialog window, select the “Recall Engine” tab. This shows the list of engines from the JMRI roster with their names. It also lists all the numbers you’ve recently used for a quick recall:
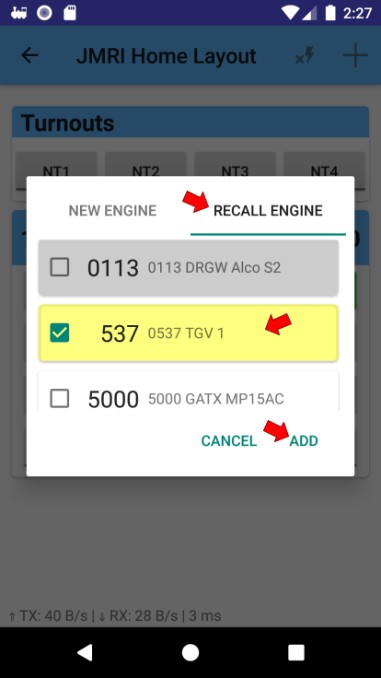
Entries listed in gray are already being controlled and cannot be selected.
Once an entry is selected, it becomes highlighted in yellow with a check mark.
Click the “Add” button to confirm and start controlling that engine.
4.3- Controlling an Engine
Each throttle is a card that lets you control one DCC engine:
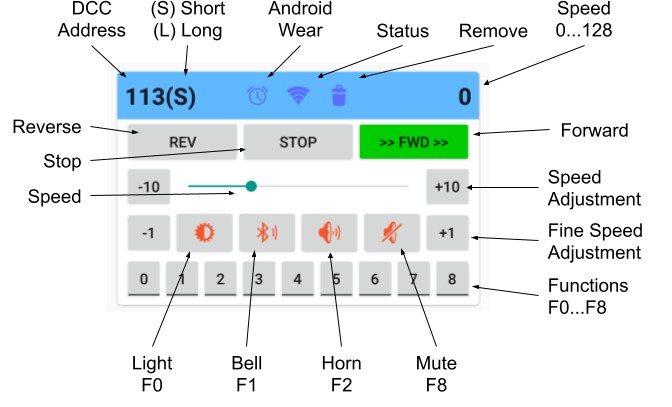
Direction is set using the “REV” or “FWD” buttons. The current direction is highlighted using a colored button (red for reverse, green for forward), as well as chevrons “<<” or “>>”.
The “STOP” button brings the speed to zero. In JMRI’s term, this is the “idle” speed. It is not an e-stop, and engines will stop gradually if they have any DCC momentum defined.
The speed is always displayed using the newer DCC “128” scale (which in reality maxes out at 126).
The -10/+10 buttons are used to quickly decrease/increase the speed, whilst the -1/+1 buttons can be used for fine adjustment. The slider in the middle displays the current speed, and can also be moved manually to alter it.
The bottom row represents DCC functions F0 through F8. The buttons are highlighted in yellow when the functions are activated. The four icons above are “quick access” to typical DCC functions. Right now the function numbers are hardcoded, and this limitation should be addressed later. As for now, they are defined as:
- F0 = headlight (DCC/NMRA standard).
- F1 = bell on/off.
- F2 = horn.
- F8 = sound on/off.
4.4- Controlling Multiple Engines
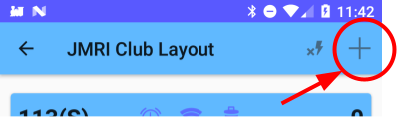
As shown above, the throttle screen lets you control more than one engine at a time. To add more throttles, simply click the “+” icon in the navigation bar at the top.
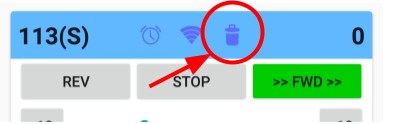
To stop controlling a train, click the “trash” icon on the selected entry:
4.5- Connection Health
In some clubs, I found the cell phone would regularly disconnect from the wifi. Even though the app itself cannot prevent that, it makes it clear whether the app is properly connected to the JMRI server. Each throttle card has a clear connection status icon:
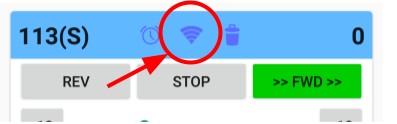
The connection icon has following colors:
- Green is the default and indicates a good connection.
- Yellow means there is a connection, yet it has significant lag. Train commands may not happen in a timely fashion.
- Red means the connection is unreliable.
It is worth noting if the connection drops completely, the app automatically tries to reconnect to the server.
The bottom of the screen displays details on the status.
When the app is connected, it shows the transmit/receive speed and latency:
<TODO replace PLACEHOLDER IMAGE>

When the app is not connected, it shows the reconnection attempts:

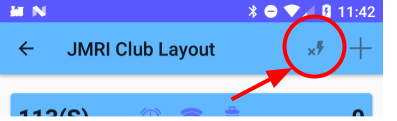
4.6- Disconnecting from Server
Use the “disconnect” icon to disconnect from the server, and return to the servers screen.
This does not stop current trains, so be sure to set their speed to zero first if that’s what you expect.
Note that using the Android back button, or the home button, or switching to any other app, does not disconnect from the server. You can switch back to Cab Engineer by selecting the notification in the notification area.
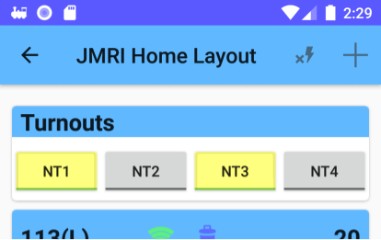
5- Controlling Turnouts
Cab Engineer can also control turnouts that are listed in JMRI. They appear as a card above the engine throttles using the system names configured in JMRI:
6- Limitations & Planned Features
This is an early release of Cab Engineer. As such, it has the following limitations -- these are all features I personally want to have in the app, and they will be added later as time permits:
- No “multiple unit” consist support yet, that is the ability to select multiple DCC addresses and control them as one unit.
- Workaround 1: You can define consists definitions in JMRI. The JMRI roster is available from Cab Engineer when connecting to a JMRI server.
- Workaround 2: If you have a command station that can create CV19-style consists (Digitrax, NCE), you can create the consist via the command station’s controllers, and then enter the 1-127 short DCC address of the consist.
- Ability to save recently used server addresses found via zeroconf discovery with a friendly name.
- Ability to remap quick functions based on JMRI roster definitions (e.g. sound/mute is not always F8, etc).
- Ability to manually remap quick functions (remember choice per engine number).
- Ask before disconnecting if throttles speed > 0.
- Ask before releasing a throttle if speed > 0.
- Display up to F29, remembering choice per engine number.
- The Android Wear support is rather limited.
7- Privacy Policy
Alf-Labs Android App Privacy Policy:
- The application complies with the privacy and security policies set by the Android Play Store.
- The application does not collect nor transmit personal or sensitive user data.
The following non-exclusive list explains Android permissions usage:
- Internet: This application accesses your local network to perform automatic discovery of JMRI servers via the ZeroConf protocol and communicate with the selected JMRI servers.
- Access Wifi State: This application queries the state of the WiFi. If wifi is not enabled, the application does not try to connect to servers. The application only queries the wifi state, it cannot change it.
- Wake Lock: This application maintains a “wake lock” to prevent the device from sleeping once connected to a JMRI server. The lock is released when the app is disconnected from the server. This prevents the phone from entering sleep mode while you control your trains.
- Foreground Service: A “foreground service” is used to maintain a permanent connection to a JMRI server once connected. When the service is running, the app icon is clearly visible in the notification bar to remind you that the app is still running. Tap the notification icon to return to the app and use it or disconnect from the server if you are done using it.
~~
Legal attribution:
Google Play and the Google Play logo are trademarks of Google LLC.
~~
~~