The place where random ideas get written down and lost in time.
2026-06-07 - Audio Waveform and Spectrum Fuse Plugin for DaVinci Fusion
Category DEVOver the last week, I wrote this DaVinci Fusion plugin that renders a WAV audio file as a waveform and can plot EQ bands. Here’s the demo of what it can achieve:
The “fuse” (source code for the DaVinci Fusion plugin) can be found here:
https://github.com/alf-labs/video/tree/main/fusion/audio_spectrum
There isn’t a detailed explanation of the plugin there yet, so I’ll detail it here (and then shamelessly copy-paste it in the README.md for the plugin later).
Background
Last week I started working on a music video combining some train footage I had laying around and one of my all-time favourite techno tracks, Funabashi pres. Saltwater - The Legacy 2.0. I wanted an FFT/spectrum effect overlaid on the video. There’s an existing 3rd-party fuse plugin named AudioWaveform that does that, but it didn’t quite give me the output I wanted, and it was pretty slow -- it rendered at 2 fps on my aging i5-4400 desktop.
Back in the late-90s, I wrote “PowerPulsar”, a BeOS application to play with audio FFT and spectrum-based visualization. That was a few years before WinAmp and MilkDrop got popular. My point is that I had a very clear idea of what I wanted on my new video, how it could be implemented, and the AudioWaveform fuse just wasn’t getting close.
So, I just wrote my own. I mean, “how hard can it be?”
Really, it’s not since I’ve done that kind of stuff before.
Side note: I don’t do the whole “vibe coding” thing but I do use the tools I have at my disposal where it makes sense, and right now I see Gemini as mostly “Google search on steroids” so that’s what I use. As with many tools, the output is only as good as the quality of the input. Ask crappy questions (err, I mean “prompts”), and you’ll get crappy answers. It’s just like the good ol’ StackOverflow -- it’s not a matter of finding answers, it’s a matter of knowing how to find the good ones. Essentially I use Gemini as a bootstrap to get the core algorithms I need, knowing that I know how to double-check they were what I expected, and then I built the rest of the plugin “manually”, using Gemini for the Lua syntax help mostly. I estimate I saved 1 or 2 weeks of development time doing it this way.
Implementation
Let’s dig in a couple interesting parts of the fuse implementation.
First, we need to parse the WAV file. Like the original AudioWaveform fuse, I only need to handle pcm_s16le WAV files -- mono or stereo uncompressed 16-bit little-endian samples. However, contrary to that other fuse, we can implement a proper WAV parser and read the RIFF chunks correctly without taking shortcuts.
A WAV file format is essentially a derivative of the RIFF file format, and those who have been around in the 80s will instantly recognize this as an evolution of the good ol’ Amiga AIFF file format.
This format has a lot of flexibility, and at the binary level it’s composed of a sequence of RIFF chunks. Each chunk has a 4-byte tag name, a 4-byte size, and then as many bytes as indicated in the size field. This allows a parser to skip chunks they can’t handle. In this case, we only need the “fmt” chunk, as well as the first “data” chunk.
The DaVinci Fusion fuses are written in Lua, and they run quite fast thanks to LuaJIT. But that also means there’s some Lua-specific things I’m not familiar with. In this case, Gemini correctly identified I could use a library named “FFI” to use native C-style structures to map all the chunks and the memory buffers, instead of using the less efficient associative arrays from Lua. So for example we can directly declare our structures like this:
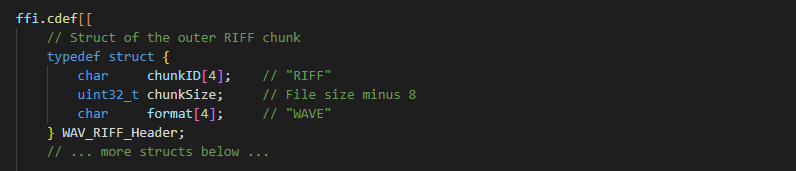
This and others directly match the structures listed on Wikipedia's WAV file header.
Similarly, the code to read that specific structure looks like this:
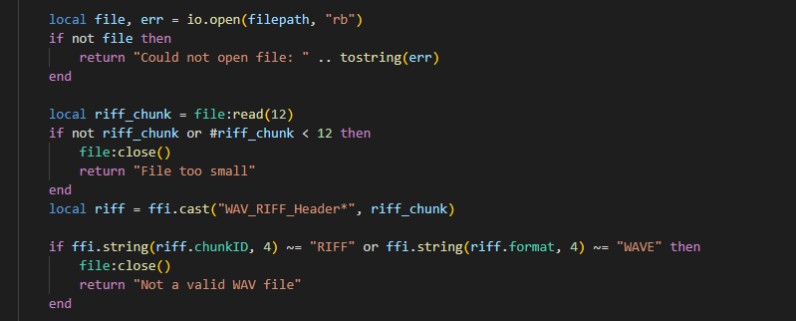
and the code to allocate the memory buffers for the data looks like this:

These are of course just extracts from the full source code, and they show how that FFI library gives us C-like optimization directly backed in LuaJIT. I don’t really need to fully know the FFI syntax -- here I can see that it’s extremely straightforward, and Gemini’s code seems spot on and very logical. I didn’t quite copy Gemini’s code as-is though, as I have my own variable naming conventions and I wanted a different error handling than what it suggested.
Goals
So now that we can read the data, we need to do something about it.
At that point, it’s important to precise that I wanted the plugin to do 4 different things:
- Display the waveform -- I want to configure a bounding box to indicate where the output should be on screen, how many seconds of music to display, but also control the shape as I want a pure waveform, a mirrored wave, or a half wave.
- Compute a VU Meter to represent the loudness of the music. That needs to be configurable.
- Compute EQ bands. Remember the typical Equalizer Visualizer on any 80s Hi-Fi equipment with VU meters per frequency band? Well that’s exactly what I want. I don’t really want a full FFT, just EQ bands.
- Importantly, it needs to export variables that I can then use to control other DaVinci Fusion tools. E.g. I want an image glow or luminosity to react to the beats, and animate VU Meter images.
FuRegisterClass
Each DaVinci Fusion plugin starts with a “FuRegisterClass()” call that defines what the plugin does and how it’s being used. The Fuse SDK is however a bit cryptic on some of these things; and then there are some misc details on “What are Fuses?” on the “Eyeon” site here. I’ll just explain what I did not find properly documented or surprised me.
Note: you can find the SDK online, however the canonical version is the one you’ll find installed on your system under “%ProgramData%\Blackmagic Design\DaVinci Resolve\Support\Developer\Fusion Fuse”.
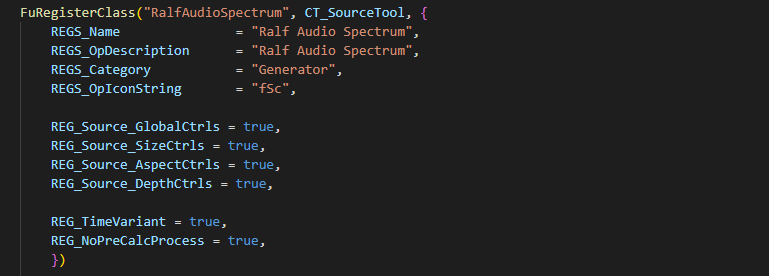
There are two interesting details to write about here.
First the plugin type. Most examples in the SDK use the “CT_Tool” type, which is an image processing type -- a tool takes an input image, modifies it, and outputs a resulting image. Here, instead we use the “CT_SourceTool” type, which means this is a generator -- there is no input image, just an output image.
This matters a lot because normally the Process() call is supposed to output an image that matches the input. But here there is no input, so we’ll need to declare our image format before creating the buffer.
The other detail that is very important here is that “REG_NoPreCalcProcess = true” line. What this means:
- In a fuse plugin, all the actual work happens in a “Process()” method.
- Normally, a plugin can have an optional “PreCalcProcess()” method. If it exists, it is always called before every single Process call. When a plugin’s output is used somewhere else -- be it the output image or any exported variable (like the VU Meter value that we want to export here), Fusion calls the PreCalcProcess method for each parameter connection first, and then it calls Process.
- The distinction is important: The PreCallcProcess method should not compute the output source image -- in fact it’s supposed to create an output image with the proper image spec and no data. It’s also supposed to export all the variables that other plugins need to consume.
- If the PreCalcProcess() method does not exist in the plugin and that REG_NoPreCalcProcess is set to true, then Process() is called instead, with a special “req.isPreCalc()” boolean set to true. We use this here because it turns out that the workflow we do is the same for both. In the “preCalc” case, we just don’t compute the content of the output image, but in both cases we still need to compute our VU Meter values and our EQ Band values so that we can export them.
Unfortunately, the Fuse SDK does not have good samples to know how to implement a CT_SourceTool. You know one thing DaVinci Resolve loves? It loves to quit if you don’t carefully do what the Fusion processing expects. And I’m not saying it “crashes”, I’m literally saying the app quits, with no error message and no log and no warning whatsoever. That makes for a fun development cycle when getting started! Hilarity ensues!
After 2 days of hair pulling, that’s where I found that one must not have that PreCalcProcess() method in the source code, even if there’s a FuRegister flag that says it won’t be used. Really? Yeah, whatever. It’s explained here in detail. Eventually I got a proper way to get the plugin to work, with a process method that looks like this:
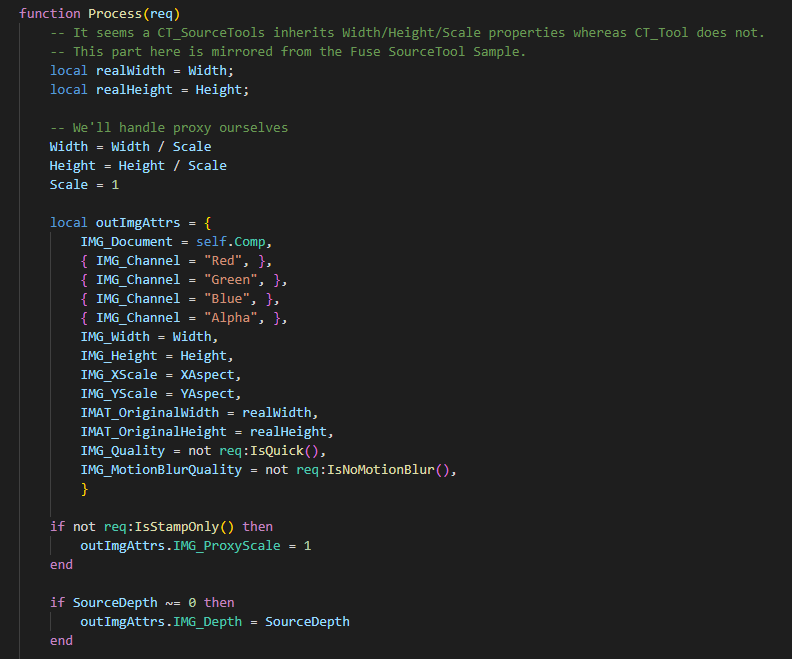
I did not invent this code. I found it in a Fuse sample somewhere on the ex-Eyeon web site I think. Unfortunately, I forgot to write down the URL and now I have no idea where I found it.
And here’s what the rest of the Process method looks like:
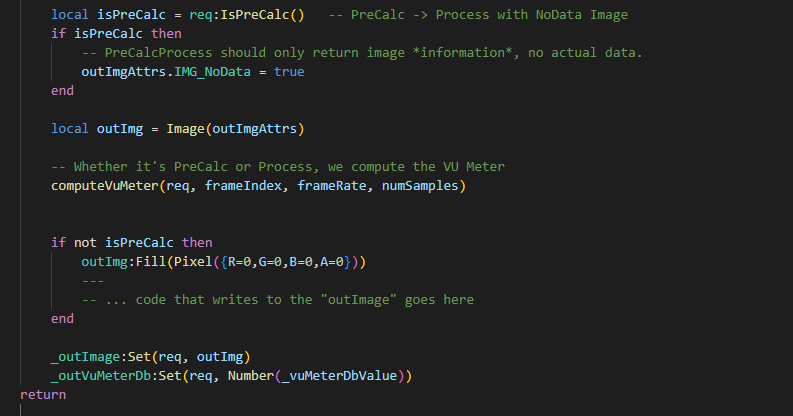
So in summary:
- We always compute the VU Meter value[* sort of, see below]
- If it’s “pre calc”, we create an image object of the right size with no backing buffer (a.k.a. no data), and we output that “specs-only” image as well as our exported variable (the real code exports more than one variable, I just simplified it here).
- If it’s not “pre calc”, we create an image with actual data, initialize it (otherwise it gets whatever was in the last buffer, another “hilarity ensues” very puzzling case), and actually draw the new frame, and then we export both the image and our variable(s).
Now, that PreCalc thing seems to be called for every single fuse tool connection. So if there are 3 other tools using the exported variables, we’ll get 4 PreCalc calls (3 for variables, one for image spec), plus the actual Process call. A total of 5 calls, all with the same frameIndex. We don’t want to recompute the same VU Meter value 5 times for no good reason. So the actual computation is guarded like this:
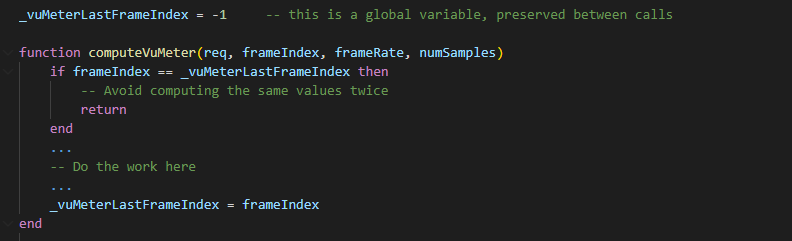
All the computed values are stored in global variables. If the frame index has not changed, we’re rendering the same frame and thus there’s no need to recompute the same VU Meter value for the same frame.
One thing I did not realize at first is that any variable defined without “local” is global, and more importantly, is preserved between Process() calls. So it’s trivial to just remember the state from the last frame. The only thing to remember is that we're operating in an NLE -- a non linear editor. The fuse plugin is called on non consecutive frame numbers when editing. But during rendering, it's called on consecutive frame numbers, and we can use that.
I don’t think that’s really stated clearly in the Fuse SDK, and it feels like a missed opportunity.
At this point, it’s also important to explain that there are typically two separate instances of the plugin. When using Fusion, there’s one instance connected to the UI panel for the plugin itself. And when rendering, whether in the Fusion tab, or the “Edit” timeline pane, or in the “Deliver” pane (to export the final movie), that’s another instance. They do not share the same memory, and thus have different global variables. And yes, it does mean that audio data is loaded twice in memory when the tool UI is shown.
This particularly matters if the code starts to react to tool UI changes in the NotifyChanged() callback. This happens in the UI instance, and thus any global variable modification does not impact the rendering in the viewer! The only exchange that happens is via the “input” controls.
VU Meter and EQ Bands Computations
I’m not going to dig too much into the computations used for these. You can look at the source code, and I'm linking to the Wikipedia entries explaining the theory behind, it’s fairly self-explanatory.
Generally speaking, the Wikipedia entry on VU Meters tells us what we need to know: it’s about computing the root-mean-square (RMS) value of a sample -- which implementation is really all into the name as it’s just the sum of samples squared then divided by the number of samples (also known as a mean).
In the plugin case, I cheat a bit: we can configure how many samples are used, and thus the value we get is not a pure VU Meter decibel value (which is defined for a very specific frequency). Wikipedia has a funny anecdote where they explain “VU Meter” can mean “Virtual Useless Meter”, and that applies neatly here. The implementation has a smoothing factor that can be used to control the rise and fall rates, but most importantly we can control the reactivity simply by changing the number of samples used for the RMS.
The VU Meter value is a 0..1 unit, which is then converted to a negative logarithmic dB number (technically, a dBFS number). But, because its value can be unpredictable, I also provide a min and max value, with a decay on the max.
The entire point of all that stuff is that I can then use this to scale the waveform accordingly: I want to change its height based on the instant loudness of the music. Thus the ratio of the VU Meter value vs its max provides the amplification value I want for the waveform.
For the EB Bands, as I explained earlier, I specifically did not want an FFT. These take too long to compute. I wanted something faster, more reactive, and actually simpler to implement.
And here comes in the Biqual Filter, or more exactly the Digital Biquad Filter. The implementation I got from Gemini neatly matches the Bilinear Transform Example given by Wikipedia, and then uses some features of Lua I was not familiar with (like the ipairs() call and the associative array of structures which are in fact also associative arrays). Good enough for me.
Usage
The image output of the plugin corresponds to the image on the left here:
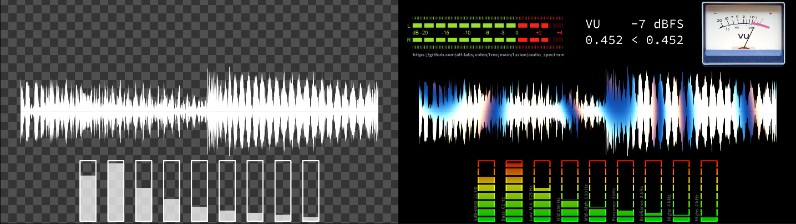
The output is purposely just white, because I’m going to then compose it or mask it with other effect layers, as can be seen on the image on the right above. To do this, I also use the exported variables, for example to animate the VU Meter dials.
Here’s the node graph that produced the image on the right:
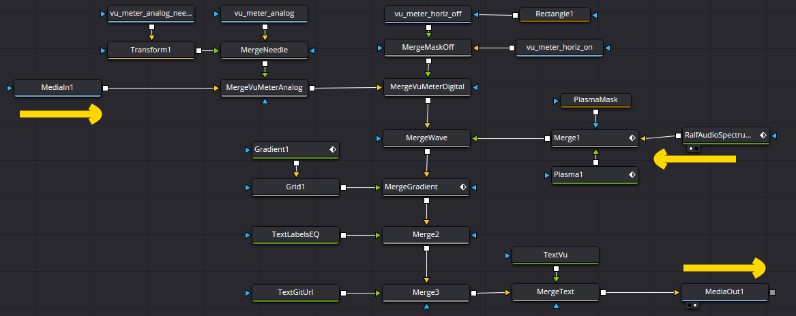
I particularly enjoy the flexibility I can get out of the plugin.