Model Train-related Notes Blog -- these are personal notes and musings on the subject of model train control, automation, electronics, or whatever I find interesting. I also have more posts in a blog dedicated to the maintenance of the Randall Museum Model Railroad.
2023-01-02 - Cab Ride Videos with the Mobius Maxi 4K
Category Video
I have a fair number of “cab ride” videos on my channel. I particularly enjoy this kind of view. Over the years I’ve been experimenting with various ways to achieve them. This is what I’ve been doing recently:
The camera I use right now is a Mobius Maxi 4K. All these cameras are designed to be “action cameras”, and record “lifesize” objects, typically outside. When used in-door, image quality tends to be unsaturated, with low contrast. That can be easily adjusted in a video editor like DaVinci Resolve or Lightworks, which I use.
One prominent issue though is focus. These cameras simply do not have any adjustable focus. They have fixed focus. It’s great when shooting live action inside or outside. It’s a problem when shooting small details on an HO layout.
In the case of the Mobius v1 or the Mobius Maxi 4K, the minimal focus is about 4 or 5 inches. Anything closer than that will be blurry.
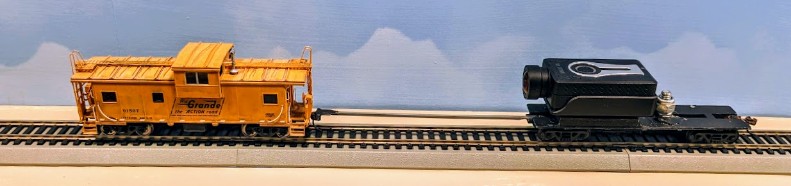
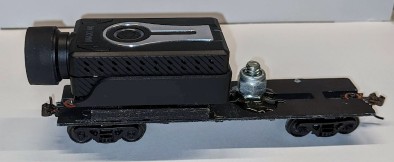
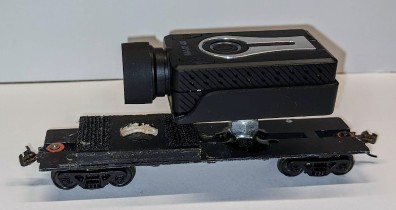
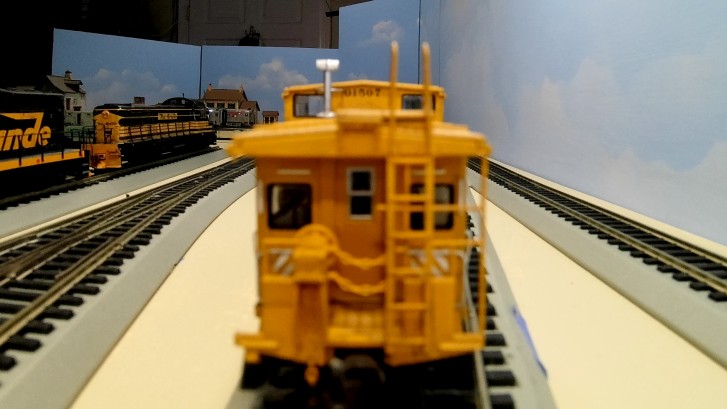
Camera Car
One thing I did early on is create my own “camera car” custom-fitted to hold the Mobius (v1 or Maxi 4K) securely:
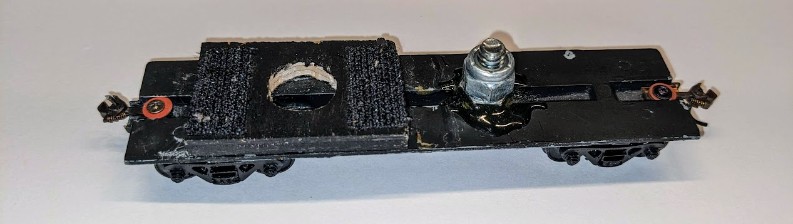
This offers two mounting options:
- The screw allows me to thread the camera using the camera mount adapter. It places the camera higher, giving a view of the rooftop of the last car.
- The front features a piece of wood with 2 strips of velcro and a hole fitting the camera mount adapter. This places the camera lower to the ground, which is better for cab rides (with no train in front) or centers a train vertically in the view.
The screw is in theory nice because I can set the camera a bit higher. Unfortunately it brings the center of gravity a bit too high and the car tends to tilt in curves. That’s a bit less of an issue with the camera on the wood holder.
There are two possible kinds of videos here: a “real” cab ride where the camera is pushed by an engine. In this case, we don’t have anything blocking the view of the camera, and lack of near focus is not really a problem.
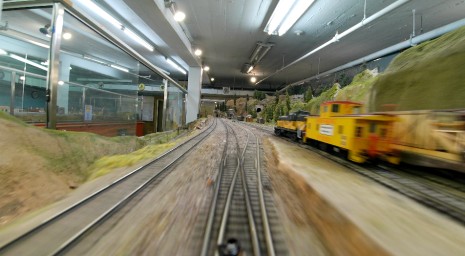
One thing to be cautious about, though: placing the camera closer to the ground makes everything look like it’s going faster. That’s a pure psychological effect. In my early cab rides, I often got viewers complaining that I was running “at slot car speed” when the train was at the same speed as when filmed from the outside! The solution is simple: remember to slow down. On a DCC 28-speed scale, I simply run at least 2 or 3 speed notches slower.
The other kind of video is with the camera turned towards an engine or the last car of a train. The fixed focus makes the front of the engine or the car fuzzy, which is annoying. And because it’s so close, it takes a lot of screen space and hides the rest of the layout.
Ideally we want some space between the camera and the last car. In early videos, I’ve tried doing a “chase” kind of thing where an engine with the camera is following the train I want to record. This was finicky, the speed match and the distance were never perfect, and I was never fully satisfied with the result.
Experiments
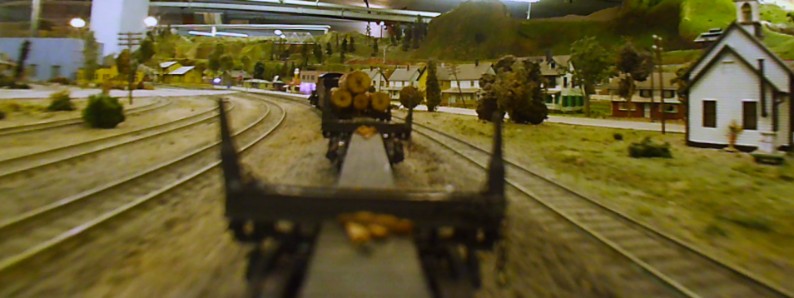
Instead, in later videos, I switched to attaching the camera to the rear of the train. To prevent the last car from being distractingly out of focus and filling the screen, I use a buffer between the camera and the train: stick the camera on a flat car, and accept that everything right in front of the camera would be blurry. I’ve tried several variations of that: using a gondola, or using a logging car, or using a flat car in the between.
1st Attempt: Processed view from SQ12 camera using a logging car as buffer.
2nd Attempt: Raw unprocessed view from Mobius v1 using a gondola as buffer.

3rd Attempt: Raw unprocessed view from Mobius Maxi 4K using a flat car as buffer.
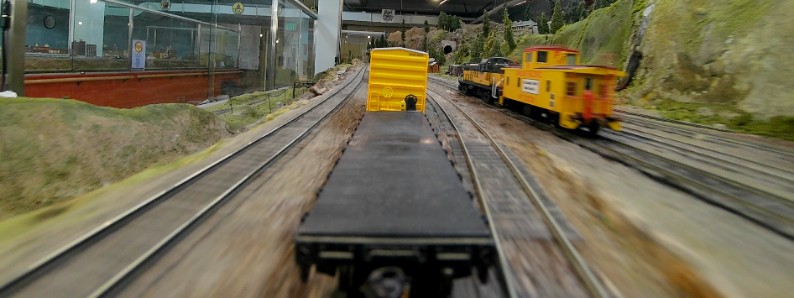
None of these have been satisfactory. Notice how the part next to the camera is fuzzy and out of focus.
Draw Bar
What I’ve tried last year is to create an “extended coupler” or a “draw bar”. I’ve tried a few variations, from a piece of copper wire, to 3d printing my own versions, including in “transparent PETG” (which turned out to not be that transparent):
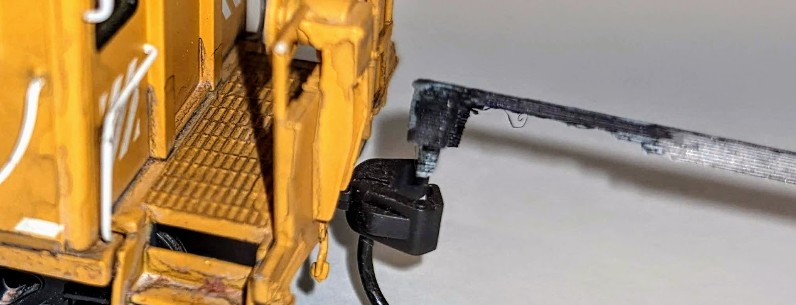
Early version of a 4-inch draw bar with a Kadee coupler at the end.

The current version I use is a 5-inch long draw bar 3d-printed in PLA and painted gray. It’s not perfect, and some people find that distracting, to which I somewhat reluctantly agree. In the earlier versions, I fitted a Kadee coupler at the end connecting to the train. In the latter versions, I removed that and instead the 3d-print contains a little flat surface with a pin that directly fits inside the train’s coupler. That would not work with a European HO or an old-style NMRA coupler.
A variety of draw bars, from 2 mm thick down to 1 mm thick. PETG or PLA.
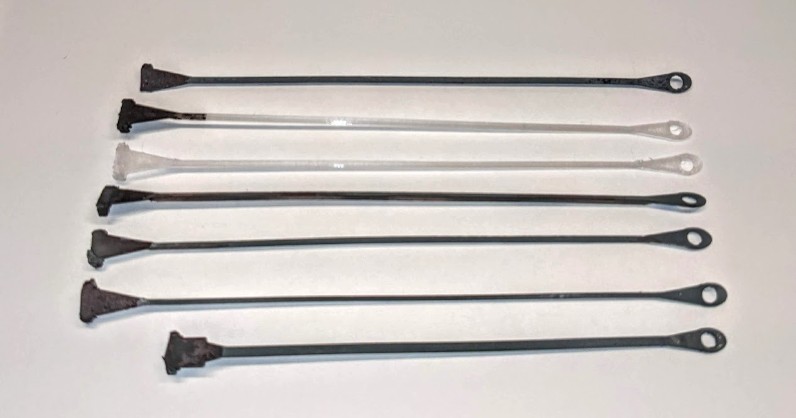
The “transparent” PETG can be seen above (3rd bar from the top). Unfortunately when filmed on video, it results in a shiny milk-white object painfully visible on camera. To make the draw bar less outstanding, I now spray paint it using Rust-Oleum Cold Galvanizing Compound because it gives a nice gray dull matte finish, and I paint the car coupler part in black using art acrylic paint since most couplers are black.
Instead of a full coupler, the 3d-printed end contains notches that fit in a Kadee coupler (see 3d drawing below).
Here’s the model on TinkerCad: https://www.tinkercad.com/embed/8ISmuUwy1O4
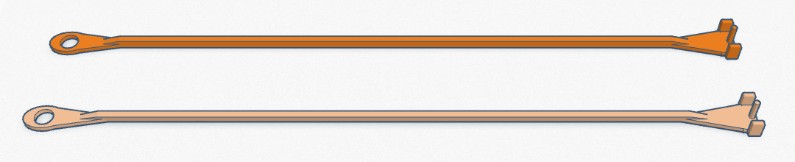
Simply export it to STL and print in PLA.
I’ve tried making the draw bar as thin as possible. I currently run versions which are 1.5 mm wide. When printed at 1 mm wide, the PETG or PLA 5-inch bar becomes too flexible and bends when pushed by the train. The 1.5 mm wide version bends a bit but not too much.
LED Banding
"Banding" is that horizontal dark bands effect that appears on video when the light source’s frequency isn't matched to the shutter speed:
This typically appears with fluorescent lighting or LED drivers and dimmers.
For fluorescent lighting, it's typically enough to configure the camera to match the electrical grid frequency, e.g. 60 Hz in US or Canada, 50 Hz in Europe or China. The Mobius has such a setting, and it should be set to match your electrical grid frequency. Recording should then be done at either that or half the frequency (25 or 30 fps).
For LEDs, I've seen two types of issues: LED dimmers even with stabilized DC power, and cheaper LED lighting powered directly off AC power.
Most of the common “consumer grade” LED lights now-a-day are powered directly off the AC electrical grid. They typically use a bridge rectifier and some sort of smoothing to drive the LEDs, but often that smoothing is not strong enough and the light fluctuates at the frequency of the electrical grid. That typically results in two large dark bands recorded on video. A simple solution is to film at half the frame rate of the AC electrical grid -- e.g. 25 fps for a 50 Hz system, and 30 fps for a 60 Hz system. However the bands may still be seen moving very slowly as there’s no synchronization between the AC grid and the recording camera.
At home, I illuminate the layout using LED lights powered by a decent AC-to-DC 12 V adapter. The output is a stable 12 V that effectively produces no banding. Later I added a LED dimmer, and that’s when I noticed banding on the video output, as per the screenshot provided above. It turns out that the dimmer works by creating a saw-tooth pattern at ~675 Hz. This is nice for the human eye yet is unfortunately very visible on video as this creates a lot of small darker bands.
The "solution" here is, well, simply set the dimmer to full when filming. And I typically end up filming everything twice because I always forget the dimmer issue, and only once I’m done I realize all my footage is worthless and I need to start it all over with the dimmer set to full brightness.
Film Editing
I used Lightworks Pro in the past for editing; these days I’m using DaVinci Resolve -- Lightworks has radically awesome fast editing capabilities, but Resolve wins with integrated Fusion effects and motion stabilization. On the color grading side, they are both similar given my very limited needs. Both have a reasonably steep learning curve, yet nothing too drastic. Once learned, they are really easy to use.
I set the Mobius Maxi 4K to record in MP4, with a max length of 10 minutes. When the camera reaches that time limit, it automatically creates a new video clip. The transition is seamless once all the files are dropped in the video editor. The editor seems to handle the MP4 container better than MOV, even though they both contain h264.
The workflow I use in DaVinci Resolve is fairly minimal:
- Create a 1920x1080 30 fps project, and change the image import setting to center-crop.
- Drop the 4K raw footage. Apply a Y translation of 60 to focus the view a tiny bit more on the rails than the ugly layout ceiling.
- Color grading: contrast to 1.1, saturation to 70. Set white balance and temperature to taste.
I typically film with 2 or 3 runs: camera car behind the train, camera car in front of the train looking at the engine. Optionally I’d do a pure “cab ride” video with the camera car in front of the train looking forward. Another option is cut the train and place the camera car behind the engine, as I did for the UP Turbine (see below). That means for the 15~20 minutes it takes to do a full loop at Randall, I typically record at least one hour of video.
What I’ve been doing lately is use the multi-angle feature of DaVinci Resolve: recombine each clip and make a front vs back “camera angle”, then create compound clips and merge them into a multi-angle clip. At editing time, I can then switch cameras. It’s a bit more complicated than that because the segments never end up being perfectly synchronized, but overall it does simplify a bit the final editing. The only drawback is that the compound clips are locked into the project resolution (1920x1080), so once we have the multi-angle clip it’s no longer possible to pan around in the original 4K medium.
Here are a couple videos I made using the Mobius Maxi 4K camera:
More videos are available here.
Follow up read: A custom DaVinci Resolve Plugin to remove the draw-bar.