Model Train-related Notes Blog -- these are personal notes and musings on the subject of model train control, automation, electronics, or whatever I find interesting. I also have more posts in a blog dedicated to the maintenance of the Randall Museum Model Railroad.
2025-11-15 - HO Live Camera Car, Version 2
Category Video
A few years ago I explored creating an HO-size live camera car using an old pin-point IP sec camera. It had terrible quality and I dropped the project. I also explored using an ESP32-CAM and abandoned it as the quality was not impressive. This time I want to start again, yet using a Raspberry Pi Camera as the basis.
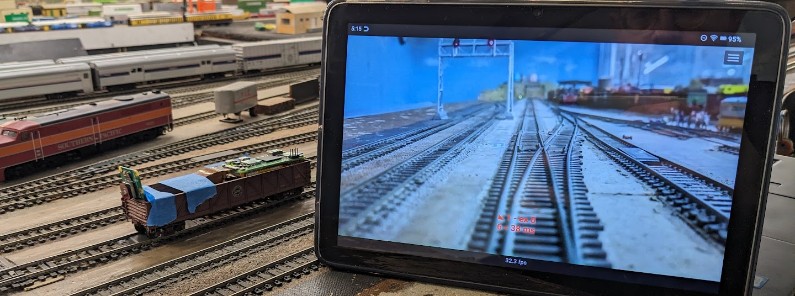
A quick prototype test, displaying the camera video on a tablet running TCM.
The problem with the ESP32-CAM is that the default camera that ships with it is an OV2640 (datasheet here), which is an image sensor from OmniVision released in 2005. It’s not a bad image sensor, except that this thing is seriously outdated and has a crappy image quality out of the box -- there’s been a ton of progress on image sensors since then.
Hardware Choice
Instead, the new project is going to be based on a Raspberry Pi. After looking at the various options, I opted for a Raspberry Pi Zero 2 W:
- This is a fairly compact board that fits nicely on an HO-size car.
- Processor is a 1GHz quad-core 64-bit Arm Cortex-A53 CPU, similar to the one of an RPi 3.
- 512 MB SDRAM.
There is no reason to use a Raspberry Pi Zero -- it's only marginally cheaper yet has the single-core CPU from an RPi 1. From direct experience, this is extremely limited and slow. The Raspberry Pi Zero 2 W is a much better choice.
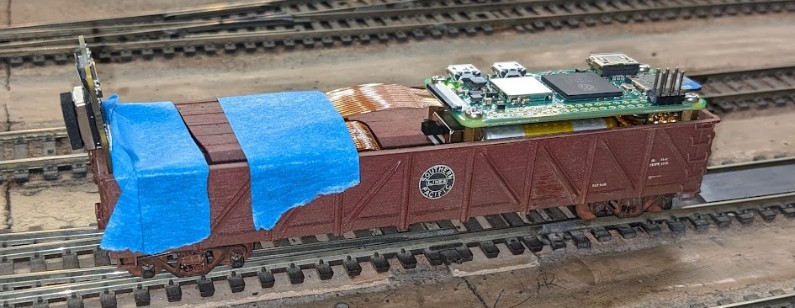
The Raspberry Pi Zero 2 W neatly fits in an HO-size gondola car!
Now we need to select an adequate camera. There are a lot of options available. We’ll start by looking at the “official” “RPi Camera” page at https://www.raspberrypi.com/documentation/accessories/camera.html
- This has command-line examples of how to interface with the camera.
- There are IR and NoIR versions of the “Pi Camera”.
- “NoIR” means it does NOT have an IR filter (thus it produces “weird” colors in daylight, but that also means it works at night with an IR light).
- They do NOT come with an IR illumination source. That needs to be provided separately.
- Camera Module 1:
- 5 MP, 2013. $25. No longer produced (but many clones available).
- OmniVision OV5647. Sensor 2592x1944 px. Video 640x480p60, 720p60, 1080p30.
- Depth of field 1m to inf. FoV 53 deg.
- Camera Module 2:
- 8 MP, 2016. $25.
- Sony IMX219. Sensor 3280x2464 px. Video 640x480p206 up to 1080p47.
- Depth of field 10 cm to inf. FoV 62 deg.
- Camera Module 3:
- 12 MP, 2023, $25.
- Sony IMX708. Sensor 4608x2592 px. Video 1536x864p120 up to 2304x1295p56
- Motorized focus (a.k.a. Autofocus on some pages)
- Standard: Depth of field 10 cm to inf. FoV 66 deg.
- Wide: Depth of field 5 cm to inf. FoV 102 deg.
- “AI Camera”:
- $70. Sony IMX500. Sensor 4056x3040 px. Video 4056x3040p10 up to 2028x1520p30.
- Note: the FoV listed is the “widest” for the sensor e.g. horizontal direction.
For my application, I’m not interested in having a lot of megapixels, however I’m interested in having a choice of FoV. For that purpose, the Camera Module 3 seems like the best choice, and after looking around I chose the Arducam ones:
- https://amzn.to/43sCfHv Arducam Module 3 75 deg.
- https://amzn.to/4nUwXvS Arducam Module 3 120 deg.
The Sony IMX708 was released in 2023 (link to The Verge article).
These connect to the Raspberry Pi using a “CSI” camera connector:
- Most Pi Cameras as well as the RPi 1-2-3 feature a larger 15-pin connector (1 mm pitch).
- The RPi Zero and the RPi 5 feature a 22-pin connector (it’s shorter but has higher density, 0.5 mm pitch).
- Example of cable that adapts the 15-pin to the 22-pin connector:
https://www.sparkfun.com/raspberry-pi-zero-camera-cable.html
and there’s a good image example here. - The connector is a “CSI 2” (MIPI CSI-2 D-PHY protocol)
https://en.wikipedia.org/wiki/Camera_Serial_Interface
.jpg)
Cost wise, don’t let the cheap-looking price of the Raspberry Pi mislead you. People like to tout how cheap they are, but the reality is that the Raspberry Pi is just one component of a larger setup. What I need here:
- $25 https://amzn.to/4i1HnIt : The Raspberry Pi 2 W.
- $25 https://amzn.to/43sCfHv : Arducam Module 3 75 deg.
- $20 https://amzn.to/3LEet5j : MicroSD Cards (got a 5 pack so that I can prepare and swap them easily)
- $6 https://amzn.to/48fM2mX : Mini HDMI to HDMI adapter
- $7 https://amzn.to/487le7b : Raspberry Pi Zero W Acrylic Case
- $29 https://amzn.to/43Grwtc : Raspberry Pi Zero W UPS Battery Hat
- Total: $112…
I’m not even counting the HDMI cable (I already have many), or the USB power supply (I have many of these), or a micro-USB OTG adapter. If you don’t have that, it brings your budget closer to $130. Now, I’m not saying it’s expensive, but we went 5x up from just the price of the RPi itself. That’s one thing I don’t like when people hype about how “cheap” the RPi is -- they often omit all the accessories that one is going to need.
Raspberry Pi Zero 2 W Setup
I’ll summarize this very quickly. If you need details, there are plenty of sites more adequate for newbies than this post.
- Get the Raspberry Pi Imager from https://www.raspberrypi.com/software/
- Choose Device: RPi Zero 2 W
- Choose OS: Other > Raspberry Pi OS Lite (64-bit) Trixie
- Choose OS: Other > Raspberry Pi OS Lite (32-bit) Trixie
- Choose Storage: Insert 32GB SDCard (OS really only needs 0.5 GB)
- Apply Customizations:
- Hostname: zero1
- Username: set to a default (pi / raspberry for example)
- Wifi: enter your SSID and password
- Locale: TZ Los Angeles, keyboard “us”
- Services tab: Enable SSH
- Options: remove telemetry
Several posts online suggest a 64-bit OS will be a tad faster on the 2 W but will generally use more RAM, and the 512 MB RAM limit is constraining.
It’s possible to entirely set up a Raspberry Pi in absolute headless mode (with no HDMI video connection) but in my experience it’s an exercise in frustration as one cannot see the boot messages in case of failure. So just grab a mini HDMI adapter and connect to some monitor for the initial setup, then later go fully headless over SSH once wifi + SSH is set up.
Plug the HDMI via a mini adapter, plug the sdcard, plug USB power and… it bootloops. That sounds like a lack of power. After trying various other 5V/2A USB bricks, I solved it by changing… the USB cable. That’s exactly the kind of thing which is hard to diagnose without a screen.
In the Raspberry Pi Imager customization, I requested to enable the SSH service and I pre-entered a wifi SSID and password. Apparently that did not stick, and wlan0 was not up at boot (edit: when I set up the second RPi, it worked, so that was likely user error). That would have allowed me to log in directly without ever needing a keyboard… ⇒ That didn’t work as wlan0 wasn’t connected at first. I used an USB OTG cable w/ a USB keyboard, then:
$ sudo raspi-config
1 System Options > 2 S1 Wireless → enter wifi SSID
$ ip addr
⇒ wlan0 is up, and has an IP address
$ sudo apt update
$ sudo apt upgrade
$ sudo apt install htop git openssh-server sudo ethstatus net-tools rsync curl wget vim screen tmux
Minimal X via VNC
As usual, there’s no need to have X on the machine. However, for development purposes, it comes in handy or necessary at some point (like for rpicam-apps later below), so let’s set up the most minimal X usable only via VNC with a Suckless’s DWM window manager.
- x11vnc shares an existing X session via VNC. That’s not what we want here.
- tightvncserver creates an X session and then serves it via VNC. That’s the one we want.
$ sudo apt install tightvncserver dwm
$ cat ~/.xsession
xsetroot -solid darkgreen
xset s off
exec dwm
Password gets saved in ~/.vnc/password during the first launch.
Suckless’s DWM is my go-to window manager when I need something extremely minimal. It’s not for everyone, typical usage involves keyboard controls, which is the whole selling point:
- Alt-T tiling, Alt-F floating (Alt-LMB drag, Alt-RMB resize),
- Alt-Shift-Return new terminal.
- Alt-Shift-2 [1..9] “sends” focused window to “tag” 2
- Alt-2 shows “tag” (aka tab) 2
To start and kill the X server:
$ vncserver -geometry 1280x748 :0
$ vncserver -kill :0
Connect VNC to <ip address>:0, and voila, an easy low-overhead X on demand.
Turn off Bluetooth Service
Disable Bluetooth as we’re not going to use it… it’s one less thing running:
$ sudo vim /boot/firmware/config.txt
In section [all], add:
dtoverlay=disable-bt
$ sudo systemctl disable bluetooth.service
$ sudo systemctl stop bluetooth.service # not necessary if rebooting right away
$ sudo reboot
Comparison Raspberry Pi OS Lite 32-bit vs 64-bit
I have installed the same RPi Zero 2W with Raspberry Pi OS Lite 32-bit vs 64-bit.
They both have the same minimal apt install.
This below is measured after a reboot, no specific services are started except the default out-of-the-box stuff. SSH is in use over Wifi, X is not running, BT has been disabled. Htop shows a handful of services running using almost no CPU.
Raspberry Pi OS Lite 32-bit:
$ df -h
Filesystem Size Used Avail Use% Mounted on
udev 80M 0 80M 0% /dev
/dev/mmcblk0p2 29G 3.1G 24G 12% /
/dev/mmcblk0p1 510M 78M 433M 16% /boot/firmware
$ cat /proc/meminfo
MemTotal: 436200 kB
MemFree: 191404 kB
MemAvailable: 323144 kB
Raspberry Pi OS Lite 64-bit:
$ df -h
Filesystem Size Used Avail Use% Mounted on
udev 74M 0 74M 0% /dev
/dev/mmcblk0p2 29G 3.4G 24G 13% /
/dev/mmcblk0p1 510M 66M 445M 13% /boot/firmware
$ cat /proc/meminfo
MemTotal: 426128 kB
MemFree: 184448 kB
MemAvailable: 277860 kB
OK so there is indeed a tiny bit less available RAM on the 64-bit install (see here for why MemAvailable is the number to look at instead of MemFree).
The disk space difference is rather insignificant (I have a couple wireshark dumps stored on the 32-bit box; if we remove these, that’s really the same count).
Out of the theoretical 512 MB, the memory available is 61% for 32-bit vs 53% for 64-bit. Depending on usage, that could make a difference.
Next, let’s deal with the Raspberry Pi Camera.