HO MTH GP35 Shell Removal |
2017-11
A friend of mine had a DCC-Ready MTH GP-35 (HO scale) for a while, and I offered to install a DCC decoder in it since after all it's just a trivial task of inserting a 8-pin decoder in there (no sound needed). I mean, how hard can it be?
Turns out that removing the shell on that loco is more involved than necessary so I thought I'd post how I did that; maybe it may help others later. I am also providing pictures to help in that task.
First, let's look at some existing data:
- MRH had a thread on the same subject a few years ago. It was not helpful. People breaking tabs randomly, that's not my idea of a job well done. Sadly not even one picture of the shell removed was posted to show these tabs, as that could have been really useful.
- The brochure in the box was the wrong one (SD70ACe!) but it can easily be found on the web site here https://mthtrains.com/80-2177-0 then go to support and click on the little book with a flag (PDF). Unfortunately the manual only has to offer that everlasting useless comment of "squeeze the shell gently". That's never done it for me.
- There is an extremely unusual video here on YouTube showing how to open the MTH SD70ACe by... partially opening the trucks?!! It was actually fairly eye opening.
To summarize, here's the procedure, pictures follow below:
- First you need to remove the couplers. Maybe it's an MTH thing and I'm not used to it but the couplers are attached using a small plastic piece. This is clear in the PDF anyway.
- Next, it would have been really useful to know that both the narrow hood+cab shell and the deck+handrails come off. There is no need to detach the handrails from the cab. But the trick is that they are still two parts and then didn't come off easily even once the main tabs were loose.
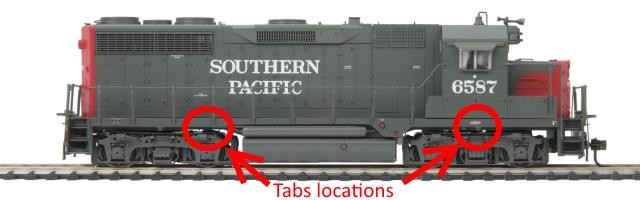
- The narrow hood shell had 4 tabs.
- The front tabs are under the front truck right in the middle. You can actually see them through the truck. I used toothpicks and inserted them through the truck, pushing the tabs outwards. Then I slightly lifted the cab by a millimeter or two, enough to prevent the tabs from closing.
- The rear tabs are under the front wheel on the rear truck. I was in no mood to disassemble the truck like in that video above. By turning the truck one way, it exposes enough of one tab to insert a toothpick and push the tab outwards. Then lift the shell just a tiny bit. Remove the toothpick, turn the truck the other way and repeat.
- At that point it gets a bit tricky because the hood was trying to lift but not the deck with the handrails! That does get handled by unsticking them gently at the front and rear part of the chassis where the couplers go.
- Once all that was done, I was able to lift the shell by maybe a quarter of an inch. Then something seemed to hang on to it again. Turns out that inside, on the plastic that holds the circuit board there are 2 more tabs and they rub against the shell at some point. By carefully tilting the shell sideways back and forth, I passed both tabs through the narrow hood.
- The next and unluckily last surprise is that the wires for the lights are really short. Barely enough to move the shell on the side.
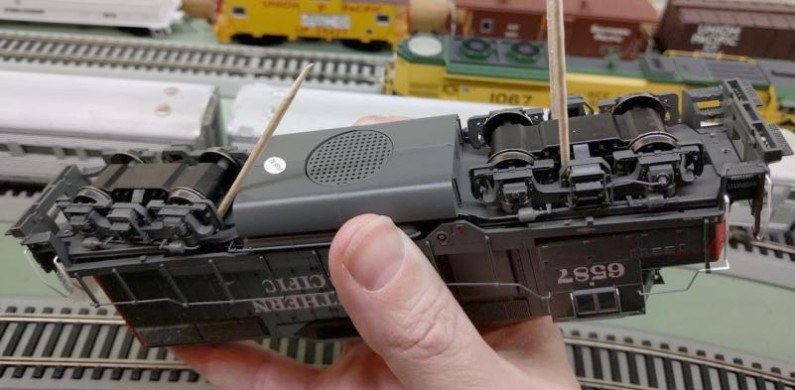
Picture with the toothpicks below. The front truck was easy as the tabs can be seen through the trucks. Just place the toothpick on the inside so that the tabs get pushed outwards. On that picture you can see the shell being a bit removed on the front, with the deck and the cab going their separate ways... yet still held by the handrails.
The rear truck one is harder... by turning the truck I could barely see one of the tab openings so I tried my best to guess where to insert that toothpick, move the shell a bit, then repeat for the other side.
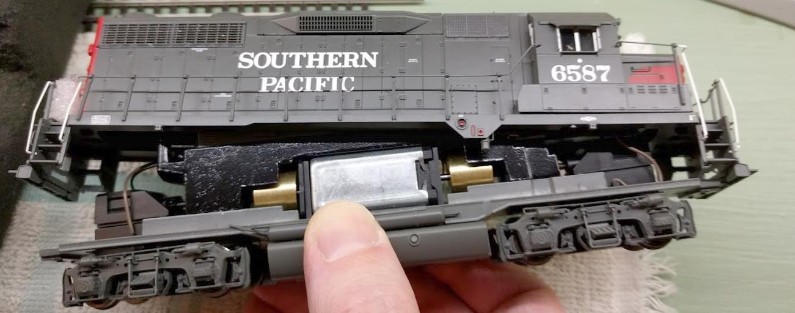
Below is a picture with the shell starting to get off. To get there I had to free the deck which was stuck around the frame where the couplers are held. At that point it got tricky again because there are 2 tabs on the inner board support and the light wires are really short and were getting in the way.
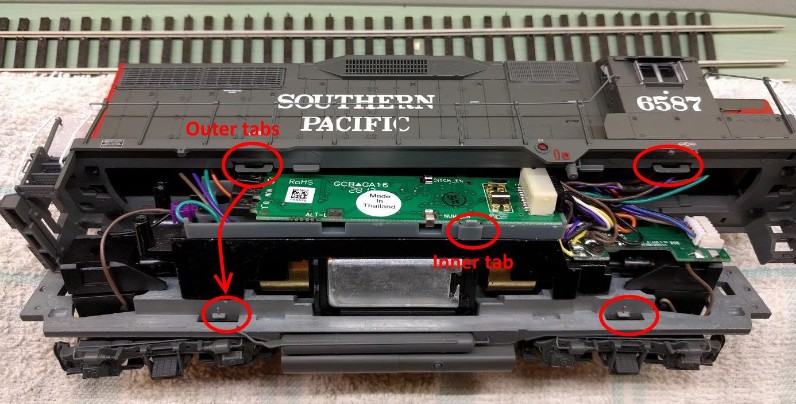
This is the final result with the shell fully open. This is as far as I can pull it due to the short light wires, but it's going to be enough to install an 8-pin decoder. On this picture you can clearly the outer shell tabs and were they clip on the frame. You can also see that little tab on the board support. Tabs on the other side are identical.
Finally I just installed a Digitrax decoder with an 8-pin NMRA plug (no sound). Nothing noteworthy to report.
Closing it wasn’t too bad. It was merely an exercise in patience and frustration.
Anyhow, I hope this will help next time someone needs to deal with that kind of loco.
This was also posted on the MRH forums: http://model-railroad-hobbyist.com/node/31772
~~
~~