Model Train-related Notes Blog -- these are personal notes and musings on the subject of model train control, automation, electronics, or whatever I find interesting. I also have more posts in a blog dedicated to the maintenance of the Randall Museum Model Railroad.
2022-10-09 - An Update on the Walthers Mainline SD70ACe
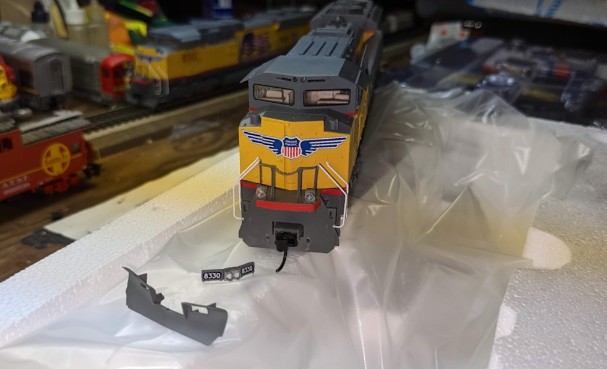
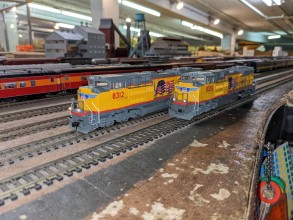
Category TrainI’m preparing two new Walthers Mainline SD70ACe to be the main Passenger Automation engines at the museum. These are Walthers UP #8312 and UP #8330, HO scale, with ESU LokSound decoders.
I’ve had some quality surprises with these engines new-out-of-the-box, so I’ll document that here.
The TL;DR is that I’m sending them back to Walthers and they will fix what are known issues with them.
Tip: If you have engines of the same run (Walthers Mainline DCC & Sound SD70ACe 910-19865 up to 910-19876), please reach out to Walthers’ customer support. They have been very courteous and helpful in dealing with the issues listed here, so please give them a chance to fix things (assuming you have any issue of course). Walthers should have sent your retailer a note, and your retailers should have contacted you about potential defects in that specific product run. In my case it turns out that there was a gap in that communication pipeline and it never happened so I had to figure most of this myself even before reaching out to their customer support.
In my case, the affected parts were Walthers Part# 910-19873 and Walthers Part# 910-19874.
Out of the Box
Disappointedly, out of the box, the engines already clearly showed issues that would require some work:
- The nose numbers plates were loose in the box. Needs to be glued.
- One of the engines’ front snow plow was also loose in the box. The other one was still attached.
- The ditch lights have unequal intensity.
- They make a weird noise when running… something’s definitely very wrong in the rear truck.
UP 8312 and UP 8330 came with a snowplow and the number plates fallen in the box.
Let’s discuss this below.
Issue 1: Cosmetic Parts Issues
Out of the box, I was disappointed to see both engines were lacking the nose number plate/headlight. These were in the box. One of the snowplows was also off. I’ll need to glue them both back correctly -- the last thing I want is for a loose part to come off when running in automation.
8330’s ditch lights are very uneven. Notice the lack of snow plow and number plate.

For the snow plows and the number plate, that’s easy. All I have to do is glue them back in place. How hard can that be?
Jim has a bottle of Zap Thin CA (cyanoacrylate glue, a.k.a. super glue) so I grab that and very quickly realize that thing is dripping… on my fingers. Oh, that’s not good! I quickly made sure to separate all my fingers before I got them stuck together, rushed to the bathroom to wash my hands with lots of warm water and soap. That leaves a hard deposit on CA on a lot of skin, which I’m not fond of, and it takes several days to break down.
Tip to get rid of cyanoacrylate glue: At home, use vegetable oil or mineral oil. I don't have any at the museum, but I have mineral spirit(*) which is also good to break it down. Soak the hardened CA deposit with the mineral spirit and rub it a few minutes, then wash hands again because mineral spirit is not the best thing to keep on the skin. The mineral spirit degrades the CA and eventually the hard CA layer will break down fairly fast (it was gone in an hour). Don’t try to pull it off, just let it break loose over time.
(*) This is California so we don’t have “real” mineral spirits here. We have this “odorless” low-VOC substitute that is, however, as good as the real thing to remove paint and CA from your fingers.
Once I’m done of this sticky mess, I went back to gluing the parts but this time wearing latex gloves and applying the cyanoacrylate glue with a small toothpick -- that Zap Thin CA is very very liquid and there’s no way to get it into the desired spots otherwise. In no time, I had the two engines with their accessories restored properly:
Now we can deal with the ditch lights.
These are implemented using a tiny square LED that is inserted in the light housing from the bottom, from under the walkway. We can see the issue clearly on this close up I took before adjusting them:
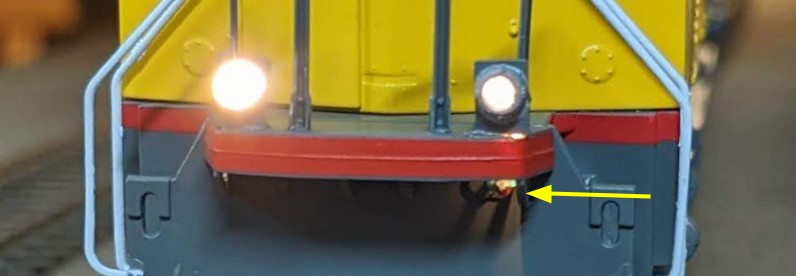
In that picture we can clearly see the two LED wires on the right side. When the lights are turned off, I could clearly see the LED inside via the transparent lens. In this case, the left light was too high and the right light was too low. With thin needles I can adjust them up and down, and then once done I can fix them in place using GE Clear Advanced Silicone II -- I use the GE Silicone II, as it doesn’t become acidic like the GE Silicone I does. The silicone dries clear and remains flexible. This is better than CA glue for this case as it means I can remove it later if I need to.
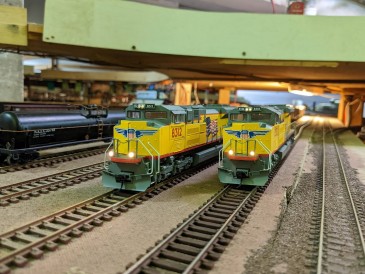
This is the end result once the cosmetic issues have been fixed:
Note that the headlight in the number plate is not very bright. That’s an unfortunate side effect of the shell design -- the light is recessed behind the cab and shines through a plastic light conduit. These setups never provide full illumination.
Removing the Shell on the Walthers Mainline SD70ACe
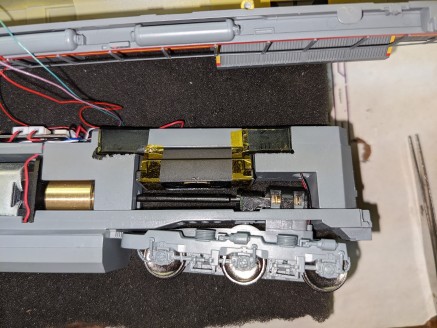
Now it’s time to fix the prominent and worrying gear noise issue on the rear truck, which means I need to remove the shell.
Removing the shell was its own little adventure and that was too much to explain here so it’s all detailed in a separate page: Shell Removal: HO Walthers Mainline SD70ACe.
Issue 2: Rear Truck Noise
Now we can deal with the core issue…
When running the engine on the balloon track, I heard a very strong gear noise from the rear truck:
I was hoping it wasn’t a broken gear, as this is impossible to replace unless I request exchanges for the entire engine. But then they both had exactly the same issue, and it would be really weird for 2 new Walthers engines to come with broken gears. Or at least I hope so.
Luckily the issue was both obvious, yet totally surprising. I was not expecting to see this:
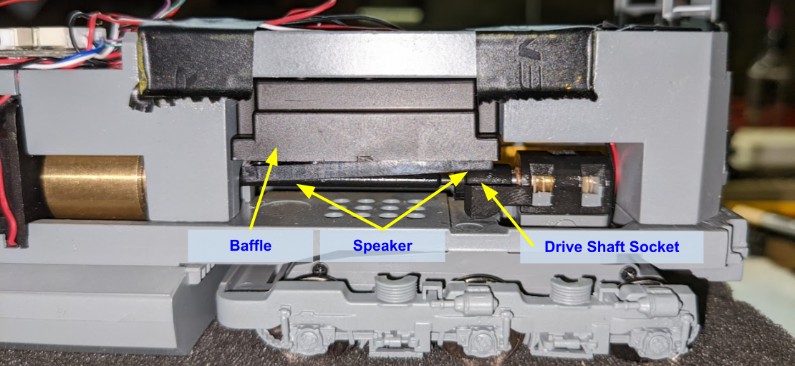
So yeah, the speaker is loose and doesn’t hold in place in the speaker baffle. Because it points down towards the track, the speaker is just falling and resting on the drive shaft. The noise I was hearing is the drive shaft socket rattling on the speaker at every single drive shaft rotation. Since it’s an oval speaker, that means it’s hitting just the end of the speaker membrane, where it is glued on its support. Amazing.
I’m glad I opened the engine right away and didn’t try to run it too long on the track. That cannot be good for the speaker.
When I build custom-made speaker baffles for DCC conversions, I generally use GE Clear Advanced Silicone II to hold the speaker in the baffle. When the silicone cures, it holds well to the plastic, and it’s still removeable. Unfortunately here I don’t think I would have been able to easily apply it since there’s not enough clearance to put a thin layer between the speaker and the baffle.
So instead I went for kapton tape to hold the speaker in place. I cut a thin strip of the tape I have at hand and carefully inserted it at both ends of the speaker:
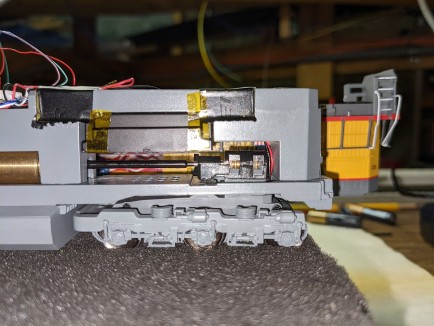
It’s a bit hard to see on the picture, yet now there’s half a millimeter of clearance between the drive shaft socket and the speaker. No more rattling.
After this fix, and after grumbling for 10 minutes while trying to put the shell back on, I had an engine running seemingly silently and very smoothly.
Then I proceeded with the other engine which had exactly the same issue, a loose speaker resting on the drive shaft and hitting the shaft socket at each rotation. I wonder how many people have that defect and can’t hear it or just think it’s part of the DCC sound effect.
Speaking of which, one final note: this is one of these designs with the speaker pointing downwards. I tend to think these give a fairly weak sound. We can clearly see that there are 12 little holes drilled in the chassis in front of the rear worm gear and that’s all the sound has to get out of the engine. It’s not much. The chassis would have allowed plenty of space to put the speaker pointing upwards, but then we know why this isn’t done here: because it would require openings in the top of the plastic shell, and that’s a lot more tooling.
But wait, there’s more…
ESU LokSound Auto-tune
The ESU LokSound decoder has a neat feature: an “Auto Tune” procedure to recompute the BEMF & load compensation for the engines. I’ve used it before and it’s great to get very good crawling speed out of these engines.
Normally the procedure is to turn all functions off, set CV 54 to 0, then send an F1 command. The engine runs for a few feet and adjusts its BEMF values.
Except when I tried that I got… nothing. It’s as-is the feature was not present in these engines.
It’s worth noting that these engines use an ESU “Essential Sound Unit” decoder. This is a simplified version of the ESU LokSound 5, so it’s possible they do not contain the programming necessary to perform the LokSound Auto-tune.
OK fine, I set back CV 54 to its default factory value of 50. There’s a bit of a mystery here, which I don’t like, but let’s move on.
Issue 3: Decoder Issues
Let’s finally break-in these engines. I put them both on the mainline on parallel tracks. #8312 starts moving smoothly while #8330 does… nothing? Then I realize even its headlight doesn’t turn on. Nor the sound. OK fine there’s no track power, right? Nope, I try with one of the DCC flag men and there’s definitely power on that track.
I reach to move the engine when I realize, outch, the hood is hot. Huh that’s not a good sign. That’s exactly where the DCC decoder is located. It’s essentially overheating.
I quickly take the engine off the track, and back to the programming track, where I also notice that it does not indeed move.
Back on the bench, I remove the Walthers Mainline SD70ACe shell again. Although the ESU LokSound is a bit warm, there is nothing obvious that could signal a short. At least no blackened tracks on the DCC decoder board, and no wires are exposed. I really see nothing even remotely noteworthy. I try the engine with the shell open on the programming track and it seems to work just fine. It responds to DCC commands for lights and speed, which it did not when it was overheating.
No idea what happened, but it seems to be working now. I carefully put back the shell, making sure I’m not pinching any wire. Then I try the engine again on the programming track and it works fine. There’s a bit of a mystery here, which I don’t like, but let’s move on.
Second Test Run, back on the mainline: I try both engines and they seem to be pretty well speed matched; running them on parallel tracks, they seem to have matching speeds. I go back and forth a few times, and suddenly I realize I have no control over #8312. It starts making a weird continuous noise like a dynamic brake noise, and I can’t stop the engine, nor does it respond to any other DCC command. Eventually the engine overruns the end of the spur on a reversed turnout, shorting in the process, and that stops it. That seems to reset it and I have control again.
That has to be a fluke, so I do a few more back and forth runs on the parallel track at different speeds and again, #8312 locks up and runs without responding to DCC commands. Losing power again resets the engine.
Finally I decide I’ll just run the engines along the entire mainline at a middle speed (16 out of 28) which looks like a decent moving speed. Since both engines seemed fairly well speed matched, I consist them together with the NCE controller, and run them on the mainline, albeit with a couple feet of separation.
Off they go after Stockton Station and bam, they haven’t even reached the first curve at Sonora that again both engines make the weird dynamics noise and I realize I have no control over them at all. This time it’s both of them, so it’s not an isolated incident anymore.
This is getting very frustrating and eerie so at that point I just pull off the engines from the track and stick them on the workbench. That’s when I started contacting Walthers and learned there’s a known DCC decoder issue with these engines that requires a “reprogramming”. Need to send them the engines for them to fix them, which Walthers takes care of. The speaker defect is apparently also a known issue.
And now the conclusion…
Updates:
- 2022-11-13: The saga with the new Walthers Mainline SD70ACe comes to a very satisfactory end: I got the engines back from Walthers. From what I can tell, their support team did exactly what they said they would do, namely change the firmware in the ESU Loksound “Essential Sound Unit” decoders. That has totally fixed the running issues. I spent some time this week-end preparing them. They are now ready to be used as replacements for automation.
I’d like to thank all the support team at both Trainworld and Walthers who have been very friendly and helpful in resolving this matter.
Updates:
- 2023-02-19: UP 8330 is now the main automation engine.
- 2023-03-14: UP 8330 has had one more occurrence where it totally failed to stop and became unresponsive to DCC commands.
- 2023-07-14: UP 8330 has stopped working and the decoder is not recognized.
- 2023-09-09: New ESU decoder replacement from Walthers’ support. UP 8330 is now functional again.
- 2023-09-20: No that didn’t work. UP 8330 ran for 2 days before stopping responding again.
- 2023-12-02: I can’t get UP 8312 to respond to any command at all; UP 8330 magically fixed itself so I put it back in automation and there, again, it only worked 2 days.
- 2024-02-09: Brand new LokSound 5 decoder to fix UP 8312, replacing the Walthers-provided “ESU Essentials” decoder that is simply just unreliable.
- 2024-06-05: And another LokSound 5 decoder to fix UP 8330, replacing the Walthers-provided decoder.
- In the span of 6 months, even with brand new LokSound 5 decoders, I’ve still had the issue of the engines starting in automation and then totally failing to stop and just keep rolling and rolling, ignoring all stop commands till they are powered off. There’s clearly a reliability issue with LokSound 5 decoders over the board.
- 2024-12-18: UP 8330 and UP 8312 are out of order as they both developed some kind of mechanical “broken gear” noise in one of their trucks. The problem appeared first on UP 8330, so I switched to UP 8312 which… developed the same issue. This is getting so frustrating.
It’s been more than a year and this TrainWorld / Walthers purchase has been nothing but a waste of money and a waste of my time.
I have to point out that neither TrainWorld nor Walthers have been willing to reimburse me for the obviously defective engines, each one pointing fingers to the other -- Trainworld: “see with the manufacturer for support”; Walthers: “see with the seller.” -- thank you both for leaving me with some crappy headache.
The bottom line is that TrainWorld lost my business, essentially forever.
Walthers also lost my business. It’s not just an issue with these UP SD70ACe engines -- I bought another GP9 from them, and there have been issues right off the bat with the ESU LokSound 5 decoder. Orion got two from the same batch of GP9 -- one had the hood melted by the ESU decoder, and the other one seems to have a bad motor after a couple hours of use. Sure the engines are very detailed and pretty, but mechanically they are sub-optimal. Not good designs at all.