Model Train-related Notes Blog -- these are personal notes and musings on the subject of model train control, automation, electronics, or whatever I find interesting. I also have more posts in a blog dedicated to the maintenance of the Randall Museum Model Railroad.
2022-10-09 - Shell Removal: HO Walthers Mainline SD70ACe
Category TrainI’m preparing two new Walthers Mainline SD70ACe to be the main Passenger Automation engines at the museum. These are Walthers UP #8312 and UP #8330, HO scale, with ESU LokSound decoders. There’s some kind of drive noise issue out of the box so I need to remove the shell of the engines to investigate.
Removing the Shell on the Walthers Mainline SD70ACe
That’s an adventure. Well, not quite, because I’ve done similar engines. Walthers is very nice and provides documentation that clearly explains how to do that: remove the couplers, remove 4 screws somewhat tucked under the truck frames, no need to remove the fuel tank. Seems fairly standard procedure.
Removing the couplers is easy. Tip: hold the coupler boxes by their sides and it's fairly easy to keep the entire coupler box intact, and neatly put it aside as-is without the whole assembly disintegrating in the process. That was much appreciated.
Now when the documentation says to remove the 4 screws under the chassis, they meant the 6 screws. There are two on the inside part of the trucks next to the fuel tank, and two by each coupler. In retrospect I think that’s what the doc was trying to say, but it wasn’t super obvious when I read the first time. It’s easier to see it in a picture:
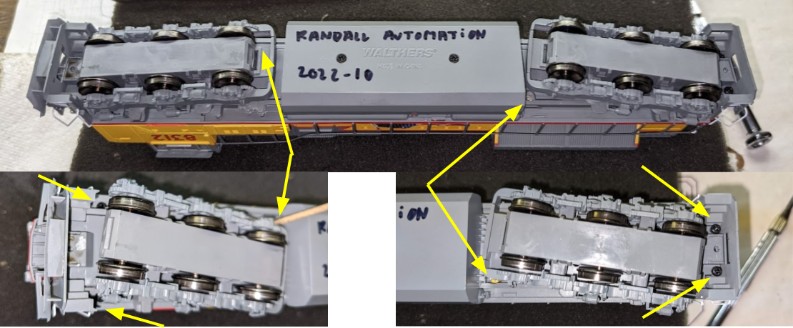
Tip: Not all the screws are the same head shape or the same length, so store them in a way you remember where each one came from.
As for the fuel tank, it does not need to be removed. There’s a benefit to removing it though. Once removed, it exposes the metal well for the motor, which gives us a very good place to grab the chassis when trying to gently remove the top shell.
To remove the shell, I do the usual little dance: try to get one side a bit loose -- front around the cab, and back around the rear vent fan. In this one, there’s clearly very tight tolerance around the cab so I gently pull the sides outwards, and that helps lift the shell. That’s where removing the fuel tank is helpful. Once I get one side slightly up by e.g. a quarter of an inch, I then work on the other end, in order to move the shell up more or less horizontally.
Finally I get the shell loose, and move it gently on the side, as all the lighting wires are attached to the cab:
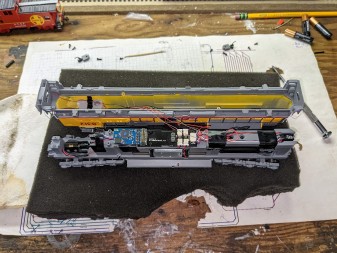
Once open, the design looks fairly clean.
When I tried the engine, I thought the front headlight was quite weak. We can see the cause of that here: the front headlight LED is mounted on the chassis, behind the cab. There’s a clear plastic light guide catching that light and piping it to the front headlight above the nose. That’s the issue. That light guide doesn’t propagate a lot of light, and we can see some bleeding in the cab. Obviously this would have been more efficient with a LED mounted in the cab, yet likely more complicated to install in the factory.
Another design issue is with the speaker pointing downwards. I tend to think these give a fairly weak sound. We can clearly see that there are 12 little holes drilled in the chassis in front of the rear worm gear and that’s all the sound has to get out of the engine before it “reflects” on the track. It’s not much. The chassis would have allowed plenty of space to put the speaker pointing upwards, although that would have required some openings in the top radiator fans.
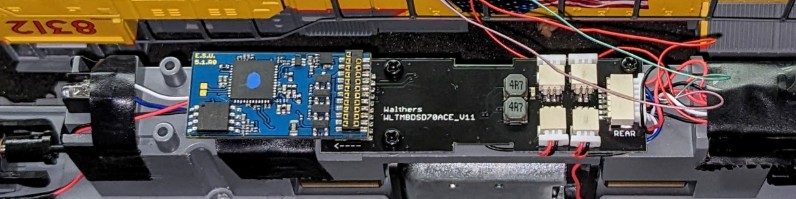
The decoder reads “ESU 5.1.R0“. That seems a tad different from the regular LokSound 5 I'm used to because it lacks the solder pins at the end of the board, so I will assume it's an OEM-specific version.
Update: The decoder is an ESU “Essential Sound Unit”. It is fully supported under JMRI 5.0 Decoder Pro. This is essentially a “limited” OEM-specific version of the ESU LokSound 5 decoder with a simplified feature set, notably a limited function map page. Both Walthers and Scale Trains use these “Essential Sound Unit” decoders.
If you use something fancy like a ProtoThrottle, these decoders can be a problem. However you just need basic running capabilities like I do, these decoders are just fine. On the plus side, because their function map is limited it only takes Decoder Pro a few minutes to read it (vs 30+ minutes for a full LokSound 5 decoder with its thousands of CVs) and the function page is IMHO a lot easier to program -- maybe it’s limited but it offers just what I need.
According to this 2020 post from the LokSound group.io forum, earlier firmware of these decoders lacked the memory function, which was then restored in a later firmware version. The firmware is upgradable via a LokProgrammer.
Because these decoders are OEM-specific, there is no documentation for it on the ESU web site. Instead the OEM (Walthers, or ScaleTrains) will have a list of CVs on their product page. The downside is that it’s a cryptic list. But for example here I need it to change the horn.