The place where random ideas get written down and lost in time.
When using DaVinci Resolve on the Windows laptop, I often have Windows in “High DPI” mode -- aka the “Scale” option in the Display Properties. E.g. on a 1920x1080 14” screen, this is set to 150%. DaVinci Resolve by default uses the DPI scaling as it should (that’s called “DPI awareness”).
If you’re curious, you’d want to read the developer docs on the DPI handling, as it’s “interesting” (a.k.a totally not simple):
https://learn.microsoft.com/en-us/windows/win32/hidpi/high-dpi-desktop-application-development-on-windows
Now the problem with DaVinci Resolve is that once the UI is scaled at 150%, there’s not much space left for the various property panes. Thus that’s one case where I do not want DPI awareness to kick in. There’s no setting in Resolve to do that, but we can notice that Resolve uses the QT library, and we can take advantage of QT’s environment variables for this.
To do this, we simply create a “resolve_1080p.bat” file with this content:
@rem change DPI scaling on laptop (1920x1080 @ 150%, but want Resolve at 100%) @cd "C:\Program Files\Blackmagic Design\DaVinci Resolve" @rem disable auto-scaling (this is a boolean) set QT_AUTO_SCREEN_SCALE_FACTOR=0 @rem set scaling to factor 1 set QT_DEVICE_PIXEL_RATIO=1 start Resolve.exe |
Now simply double-clicking that BAT file will set the QT environment variables to ignore DPI scaling, and run “Resolve.exe”. Create a shortcut to that BAT file and place it where you like to see it, e.g. the desktop or some such, and use that to launch DaVinci Resolve instead of the normal launch icon. The benefit of creating a shortcut is that you can thn change the icon on the shortcut whereas you can’t change the icon on the BAT file.
I wrote that script a few years ago and DaVinci Resolve was using QT version 5, thus the variables I have are for QT5. I expect them to stop working at some point since the latest QT6 version has slightly different names for the same environment variables.
They are described here:
- QT5: https://doc.qt.io/archives/qt-5.15/highdpi.html
- QT_AUTO_SCREEN_SCALE_FACTOR=0 → disables automatic HiDPI scaling
- QT_DEVICE_PIXEL_RATIO → sets the scale
- QT6: https://doc.qt.io/qt-6/highdpi.html
- QT_ENABLE_HIGHDPI_SCALING=0 → disables automatic HiDPI scaling
This is the variable that enables automatic HiDPI scaling. - QT_SCALE_FACTOR → sets the scale
Hope this helps!
Over the last week, I wrote this DaVinci Fusion plugin that renders a WAV audio file as a waveform and can plot EQ bands. Here’s the demo of what it can achieve:
The “fuse” (source code for the DaVinci Fusion plugin) can be found here:
https://github.com/alf-labs/video/tree/main/fusion/audio_spectrum
There isn’t a detailed explanation of the plugin there yet, so I’ll detail it here (and then shamelessly copy-paste it in the README.md for the plugin later).
Background
Last week I started working on a music video combining some train footage I had laying around and one of my all-time favourite techno tracks, Funabashi pres. Saltwater - The Legacy 2.0. I wanted an FFT/spectrum effect overlaid on the video. There’s an existing 3rd-party fuse plugin named AudioWaveform that does that, but it didn’t quite give me the output I wanted, and it was pretty slow -- it rendered at 2 fps on my aging i5-4400 desktop.
Back in the late-90s, I wrote “PowerPulsar”, a BeOS application to play with audio FFT and spectrum-based visualization. That was a few years before WinAmp and MilkDrop got popular. My point is that I had a very clear idea of what I wanted on my new video, how it could be implemented, and the AudioWaveform fuse just wasn’t getting close.
So, I just wrote my own. I mean, “how hard can it be?”
Really, it’s not since I’ve done that kind of stuff before.
Side note: I don’t do the whole “vibe coding” thing but I do use the tools I have at my disposal where it makes sense, and right now I see Gemini as mostly “Google search on steroids” so that’s what I use. As with many tools, the output is only as good as the quality of the input. Ask crappy questions (err, I mean “prompts”), and you’ll get crappy answers. It’s just like the good ol’ StackOverflow -- it’s not a matter of finding answers, it’s a matter of knowing how to find the good ones. Essentially I use Gemini as a bootstrap to get the core algorithms I need, knowing that I know how to double-check they were what I expected, and then I built the rest of the plugin “manually”, using Gemini for the Lua syntax help mostly. I estimate I saved 1 or 2 weeks of development time doing it this way.
Implementation
Let’s dig in a couple interesting parts of the fuse implementation.
Click here to continue reading...
2026-05-18 - PyRod Version 2
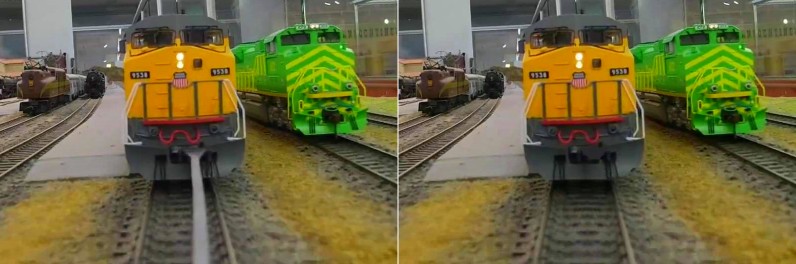
Category DEVIn this article, we’ll discuss the version 2 of the PyRod tool that I use to erase the rod used to attach a camera car to film an HO model train:
Original image captured by camera Desired image for the final video
If you haven’t, you may want to read the explanations on PyRod Version 1 here first.
For further details, you can read this blog post that explains the camera car setup that I use to film HO model trains:
The camera car setup.
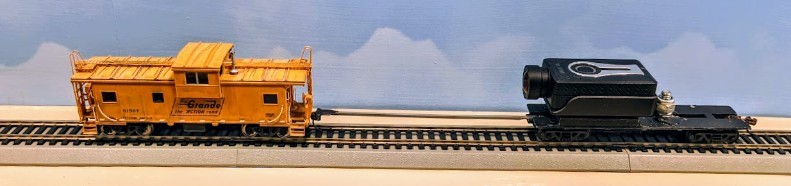
The problem is the 3D-printed rod that attaches the camera car to the train. It’s distracting once seen on the video, and needs to be removed. PyRod is a Python program that does just that.
Version 2 generates proper results like this:
In the previous article, I explained how PyRod Version 1 worked and its shortcomings. So now let’s detail how Version 2 addresses these.
Overview of PyRod 2
The tool is a Python script that processes a source video -- the one captured by the camera. It runs a multi-pass process. Each pass performs one specific action and generates either a video or JSON data for the next pass. The second iteration is structured fairly similarly to the first one. I use the same “engine”, with just a variation on the processors.
GitHub: https://github.com/alf-labs/rod/tree/main/pyrod2
The structure of the Python project is as follows:
- setup.sh: A wrapper script to create a Python Virtual Environment and install the numpy and opencv-python packages. OpenCV can be quite tricky to install -- it comes with a number of prebuilts that are tightly linked to specific versions of Python depending on whether you run it on Linux or Windows MSYS. Trying to build from scratch is an exercise in frustration that rarely ends well.
- pyrod.py: the main entry point. It decodes command line parameters, loads the input video, invokes one or more “processors”, and writes the output video and json data.
- processor.py: the base class for processors. A processor performs one pass on the video, receiving all the video decoded frames. A processor returns the video to be output, and accumulates whatever data is needed for a later pass. The data can be saved and then reloaded as JSON.
- process_coupler.py: the first pass processor. It runs a tracker that locates the coupler at the top of the rod. Details below.
- process_detector.py: the second pass processor. It determines the outline of the rod.
- process_inpainter.py: the third pass processor. It uses the previously computed coupler location and the rod outline to perform the actual inpainting.
Performance wise, the source is a 4K video, yet we don’t need to process the entirety of the frame every time. To speed up processing, a 1280x720 area is cropped out and processed. Thus all the processors deal with a 1280x720 image at most. Then the generated image is recomposed with the original 4K image to save a 4K video matching the original size and fps.
Each processor has vastly different characteristics yet overall they operate at a speed around 15 to 30 fps rate each on my desktop i5-4400 processor. The overall end-to-end processing speed is around 5 fps though, as it turns out that encoding a 4K mp4 video is quite time consuming.
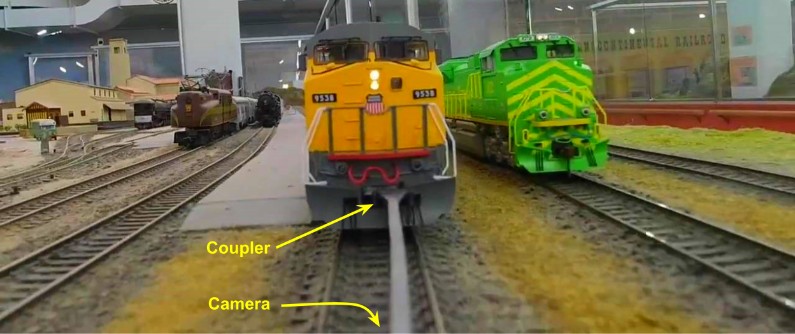
The Coupler Tracker
Before starting this project, I had already created a DaVinci Fusion plugin that performed the rod removal. This plugin required me to set up a tracker in Fusion to locate the coupler at the top of the rod and track it along the video. That provided the information needed by the plugin to locate the rod below the coupler:
Click here to continue reading...
2026-04-24 - PyRod Version 1
Category DEVI have a fair number of HO model train “cab ride” videos on my YouTube channel. I particularly enjoy a view where the camera follows the last car, or precedes the front engine. Over the years I’ve been experimenting with various ways to achieve them, and I’m currently using this setup where a camera car is attached to the HO model train using a 3d-printed long rod:
The camera car setup.
For further details, you can read this blog post that explains the camera car setup.
Back in 2023, I wrote a DaVinci Resolve plugin that “erases” the rod, which is very visible on camera and quite distracting:
Original image captured by camera Desired image for the final video
However that plugin is a bit cumbersome to use. It’s basically a flood fill algorithm based on luma thresholds that need to be adjusted multiple times along a video -- in a typical video, I end up having to do keyframe editing on the plugin parameters almost every other frame. The plugin setup is a bit involved also as it first requires creating a DaVinci Fusion tracker to find the location of the coupler at the top of the rod. That process itself is finicky as we lose the tracker as soon as the train enters a tunnel.
The rod detection also leaves to be desired. Being written as a Fuse in Lua, I’m fairly limited on what I can use when performing the rod detection: the image is first converted from RGB to HLS, and we work on the Luminance channel, scanning the image vertically top to button below the coupler, and identifying the left and right contrast edges of the rod for each scan line. This fails when there’s not enough difference between the rod and the rails or the ballast. It also fails in tunnels or other areas with poor illumination. That’s why the contrast thresholds need to be adjusted fairly frequently over the frame sequence.
Recently I’ve been using numpy and OpenCV for another project at home, and that gave me some idea on how I could approach the rod detection algorithm differently.
The first difference is that we’d write a preprocessor: an external program processes the source video and creates a copy without the rod, and then we just use the result in DaVinci Resolve like a normal video. That will dramatically speed up edits and rendering in DaVinci as it no longer needs to apply the plugin every time the editor renders the video.
Click here to continue reading...
The Ralf Delta Mask Fuse essentially recreates a custom-made Difference Keyer combined with a Merge node. It's a direct recreation in Fusion of the LightWorks FX Shader I wrote years ago.
The goal is to compare a foreground media clip with a reference image to create a mask of what is moving on the image, and then compose this on top of a background. Here's a visual summary:
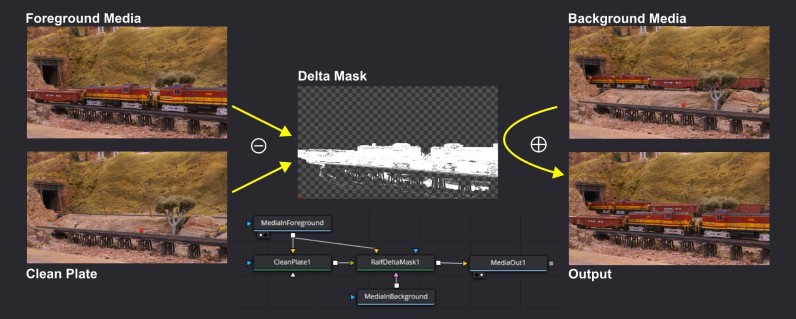
TL;DR: A foreground clip is subtracted from a clean plate reference to obtain a matte mask that represents only what has changed. That mask is then used to blend the foreground clip on top of a background clip.
Disclaimer: This can likely be achieved using a Difference Keyer and a Merge node in Resolve. With my limited knowledge of Fusion, I always struggle to configure a Difference Keyer properly to get the effect I desire. It's easier for me to program a Fuse that does exactly what I want, which I did.
Usage Guide
To use this, we need 2 or 3 media inputs:
- The "background" clip.
- The "foreground" clip.
- The "reference" -- this can be either a clip, or a static frame (a.k.a "the clean plate")
The clean plate represents the decor without the moving object. The foreground is subtracted from the clean plate reference to obtain a matte mask that represents only what has changed. That mask is then used to blend the foreground on top of the background.
This really only works properly if all the clips were filmed with a fixed camera setup, under the same illumination. I usually compensate for minor tripod movement using a Transform node with a minor X/Y offset.
Fusion Node Setup
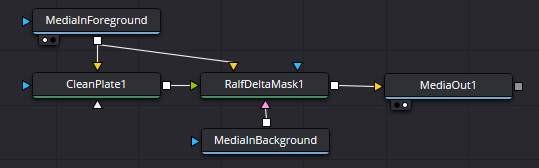
The simplest Fusion node setup is as follow:
Click here to continue reading...
I have a number of Lenovo T480s and T460s laptops, with either the Core-i5 or the Core-i7 CPUs. I know for a fact that when looking at eBay pricings, for example, the i7 laptops always fetch a higher value because they have a perceived better performance. Yet, in a day to day usage, I don’t really notice a difference between both. So, is the i7 “value added” real or hype?
Let’s look in detail at the T480s and these 2 flavors of CPUs:
- i5-8350U, Intel specifications:
- 14 nm, 4 cores, 8 threads,
- freq base 1.7 GHz, turbo 3.60 GHz, 6 MB cache, 4 GT/s bus speed,
- TDP 15W (10W @ 800 MHz → 25 W @ 1.90 GHz),
- DDR4-2400 @ 37.5 GB/s on 2 lanes max, UHD Graphics 620 @ 300 MHz → 1.10 GHz
- i7-8650U, Intel specifications:
- 14 nm, 4 cores, 8 threads,
- freq base 1.9 GHz, turbo 4.20 GHz, 8 MB cache, 4 GT/s bus speed,
- TDP 15W (10W @ 800 MHz → 25 W @ 2.10 GHz),
- DDR4-2400 @ 37.5 GB/s on 2 lanes max, UHD Graphics 620 @ 300 MHz → 1.10 GHz
The major difference between both is a 12% speed increase in the base clock frequency, and a 33% cache increase. I do not think these numbers match my actual usage perception of both machines -- they don’t feel anywhere “12 to 33% faster”.
The “marketing perception” is also that the “i5 is a great all-rounder for mainstream users, while the i7 offers more power for demanding tasks like video editing or high-end gaming” (sic). I call that dubious marketing (a.k.a “BS”). That statement is likely true for the desktop processors, but that’s not what we have here. They both have 4 cores so a i7 is not going to be able to run more tasks in parallel than an i5.
It’s important to note that these are “U” model CPUs. In Intel terminology, this means they are “mobile” (laptop) variants mostly constrained by their power dissipation (a.k.a TDP, or “Thermal Design Power”). Both CPUs have the 25W TDP envelope. The reality is that there are only so many transistors in a 14 nm die that can run at the same time and not exceed that 25 W envelope. You’re essentially limited by how much heat you can get out of these CPUs with the weak cooling architecture.
Let’s look at this from another angle: reported user benchmarks show us a reported 1%-2% increase in actual benchmarks.
Benchmarks are the way to go, but these above were a bit abstract. I thus decided to run my own benchmarks based on stuff I actually do with these laptops. This includes compiling a Flutter web app in Dart, compiling a fairly large ESP32 C++ project, compiling fairly large Java and Kotlin projects, and using DaVinci Resolve to stabilize, render, and compute Fusion VFX on one of my train videos. You know, the usual stuff one does on a laptop on a daily basis.
Here are the results:
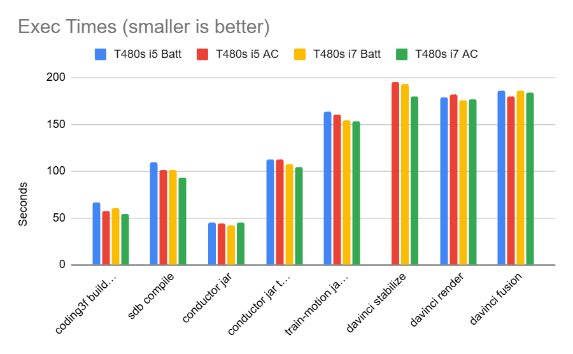
We can see that all the results are extremely close. All these results are “best of 3” for each test (I screwed up the DaVinci stabilization test on the i5 on battery and I got too lazy to rerun it again). I did the tests using both the on-AC vs on-battery mode, with the default “balanced” Windows 10 battery settings.
And thus, indeed, the i7 is slightly faster than the i5, and the AC mode is slightly faster than the battery mode. But how much is “slightly”?
I want actual numbers, so here’s a graph computing the best of each i7 vs the best of each i5 result:
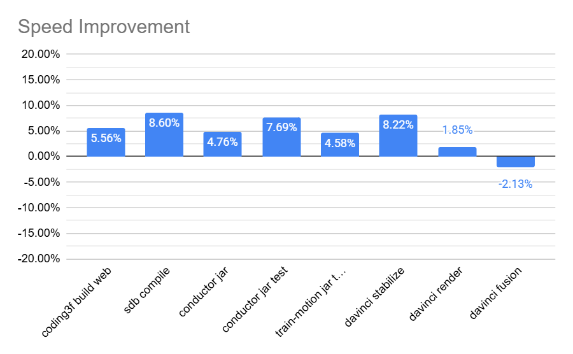
So there I have it: the i7 provides a 5-8% improvement over the i5 for my daily development tasks. I have to say it doesn’t feel like a tangible difference.
2025-12-25 - Turbo C/C++ IDE
Category DEVToday, in a “blast from the past”, I leave you to admire this screenshot of what used to be the Turbo C/C++ IDE:
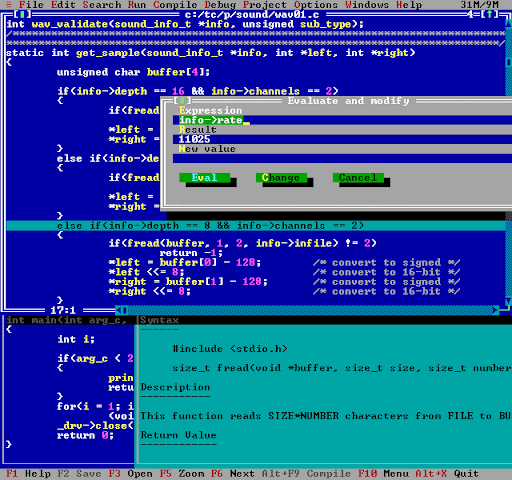
This was a great IDE, emulating a windowed environment in text mode with mouse support and everything. It had syntax coloring, integrated function documentation, and its own debugger.
The entire Borland suite, from the early Turbo Pascal, had always been a pleasure to use. Turbo Pascal was blazingly fast and a great way to get started with programming. I learned Pascal on the UCSD Pascal compiler on Apple //c, then moved to Turbo Pascal and that was a dramatic improvement. Then later to Turbo C and Turbo C++.
The other thing I used a lot back then was the Watcom C++ compiler. This was way before the first “C++98” standard was a thing. Each vendor had their own magic sauce of C++ back then.
On a night when the wind howled like a cooling fan at max RPM and the frost etched crystalline circuits upon the windowpane, the Gemini Star whispered this story into the quiet hum of the dark. It is a tale of silicon and spirit, of ancient protocols and the persistence of a lone traveler. Sit by the glow of your monitor, for the air is cold, and hear Winston Seven tell us this history full of wonder:
Click here to continue reading...
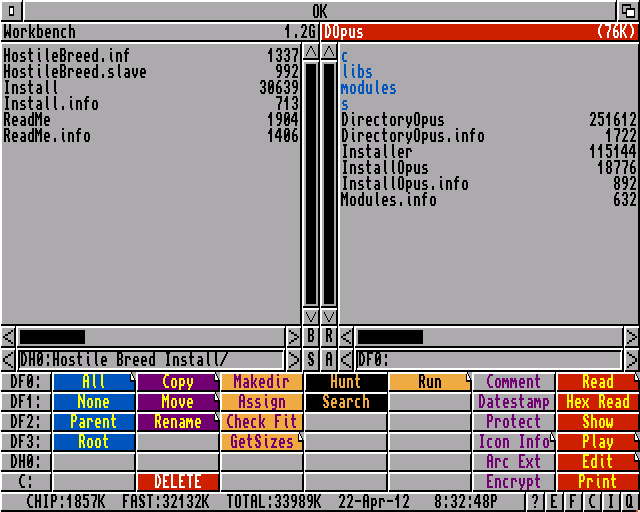
Today’s post is not about development per se as much as a “down the memory lane” kind of thing. Back in the 90s, my friends and I used to like our little “Atari ST vs Amiga 500” rivalry. It was more like an amicable rivalry as both systems had their strength. On the Amiga 500 side, one thing I still remember decades later as IMHo the “quintessential” tool on Amiga was Directory Opus, especially version 4. This screenshot summarizes it well:
DOpus 4 on Amiga 500. [Source]
There’s a nice history of Directory Opus here that makes a great read:
https://amiga.abime.net/articles/amiga-lore/directory-opus
There were a lot of good tools on the Atari ST, yet the simple and efficient UI of DOpus 4 was and is still something I enjoyed -- extremely compact, extremely contrasted, efficient to use.
A decade earlier, I was happily coding on Apple ][. The Apple ][e used DOS 3.3 and I switched to ProDOS for all my floppies on the Apple //c:
ProDOS [The same image is provided by source as well as source]
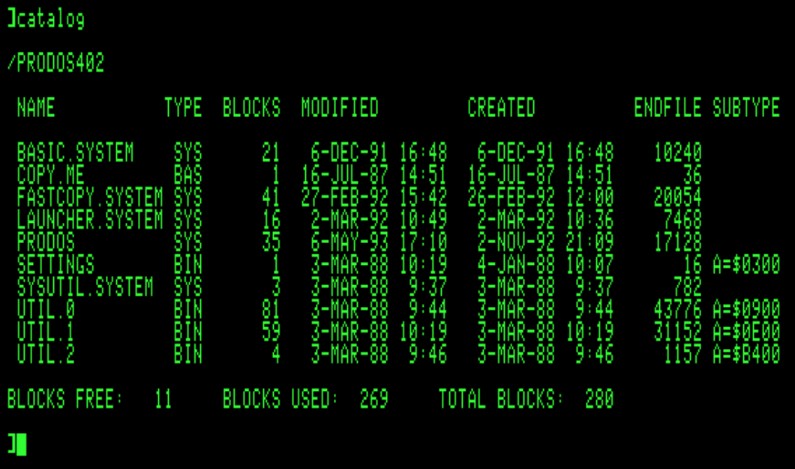
One thing I have fond memories of is actually manipulating the filesystem structure at the byte level with a “nibble” editor. Back then I severely lacked any kind of official OS documentation. That's something I continued doing on the Atari ST itself -- which was even easier as GEMDOS used a FAT12 filesystem which was very easy to comprehend at the binary level. With just a byte editor capable of dumping the raw content of a floppy, it was possible to quickly make sense of the structure and figure them out by trial and error because these just made sense.
The NCRy train could use some kind of automation in their Docent narration system. Currently, the passenger train relies on a volunteer manning the speaker system and following some kind of ad-hoc script. This screams for automation -- pre-recorded messages could be announced on the speaker system at specific points in the train’s route. As with most automation, it should be supplementary and a Docent volunteer should be able to take over at any moment, or just enable the system temporarily when they need a break. Consider this document to be a design doc / proposal document.
Curt and I had discussed about 10 years ago how we could broadcast the trains’ positions -- back in 2016 I had sent a proposal to Jim on how to create a dashboard that could display the location of each train. This proposal isn’t very different, just updated to what is now ubiquitous tech, and adapted to a slightly adjacent purpose.
If I had to build this today with current tech, I’d simply use an Android smart phone or tablet with a custom-made Android app:
- Use the phone’s GPS to get the location of the train.
- It may or may not be necessary to have a SIM for internet access to speed up the initial-fix problem (a.k.a. Assisted GNSS).
- Use the phone’s storage to record pre-recorded messages, and then play them back when the phone reaches pre-recorded GPS positions.
- We may want to have these be specific to the train direction or work both ways, and they can be set up with a distance match. That’s basically a crude geofencing solution.
- There can be multiple “tracks” that switch pre-recorded messages/locations for different kinds of events (TOL, beer train, charter, regular w-e train, etc).
Rather than think in terms of GPS position, my suggestion is that we convert GPS positions into a milepost (MP) number. That’s more familiar with everyone involved on the railroad.
Thus a “voice track” is actually a succession of “voice segments” -- each segment is a snippet of voice recording, with an MP interval in which it plays, and optionally a direction.
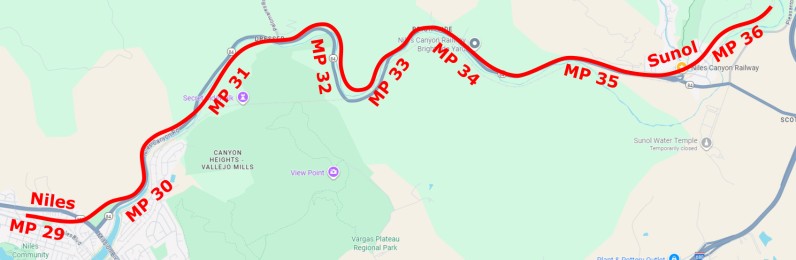
For example a “brightside” segment could have MP 33.5~34.5 -- it would start playing at MP 34.5 when westbound from Sunol, or at MP 33.5 when eastbound from Niles, or right away if the track playback is activated within the yard.
Two segments could have the same milepost range if they have different direction flags. It's useful to record something like “look at this landmark on the left” vs “look on the right” depending on the direction of travel -- which is always either eastbound vs westbound.
Usage
Click here to continue reading...